
Welcome to our guide on tiler rate per hour NZ, where you’ll learn what professional tilers typically charge, what affects their hourly rates, and how to budget for your next tiling project with confidence. Whether you’re planning a bathroom renovation, a kitchen splashback, or new floor tiles, understanding labour costs can help you compare quotes, avoid unexpected expenses, and choose the right tradesperson for the job. This guide explains the key pricing factors, typical project costs, and practical tips to help you make informed decisions while getting quality workmanship that offers lasting value.
The average tiler rate per hour in NZ typically ranges from $50 to $100, depending on the tiler’s experience, project complexity, location, and the type of tiles being installed. Some tilers charge hourly, while others provide fixed quotes for larger or more detailed projects.
- What Is The Average Tiler Rate Per Hour In NZ?
- What Can Affect A Tiler's Hourly Rate?
- How Much Does A Typical Tiling Project Cost?
- What's Usually Included In A Tiler's Hourly Rate?
- Is It Better To Hire The Cheapest Tiler?
- How To Get An Accurate Tiling Quote
- Ways To Save Money On Tiling Without Sacrificing Quality
- Common Mistakes That Can Increase Tiling Costs
- References
- FAQs: About Tiler Rate Per Hour NZ
- Conclusion
- Find A Professional Tiling Company Near You!
What Is The Average Tiler Rate Per Hour In NZ?
Understanding the average tiler rate per hour in NZ can help you plan your budget and compare quotes with confidence. While there is no single price that applies to every project, most tilers base their rates on the size of the job, the level of skill required, and the time needed to complete the work. Knowing how hourly pricing works also makes it easier to understand why one quote may differ from another.
Typical Hourly Rates Across New Zealand
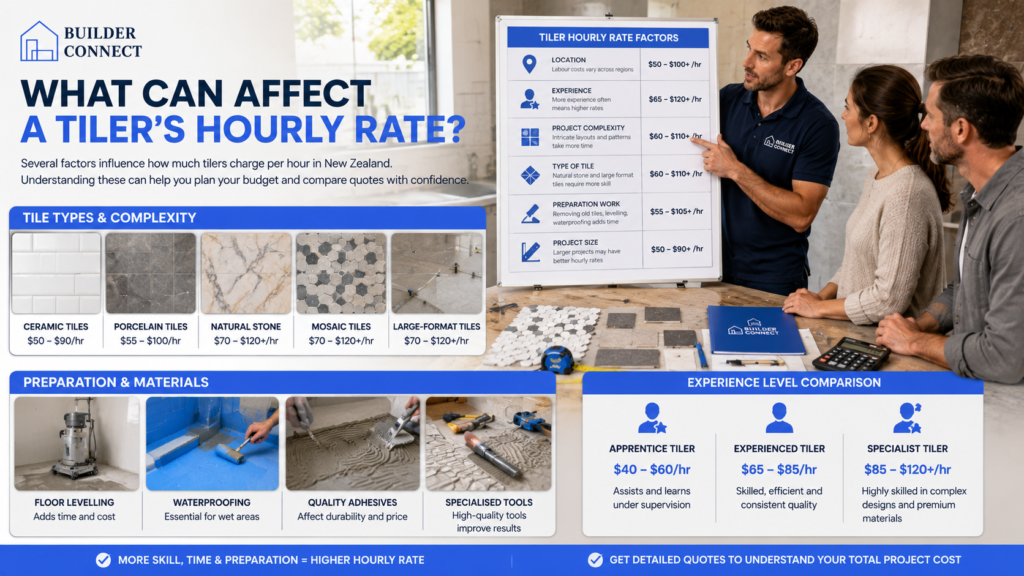
The average tiler rate per hour in New Zealand generally falls between $50 and $100 per hour. Some highly experienced tilers or those working on specialised projects may charge more, while simpler jobs may be completed at the lower end of the range.
Several factors influence the final hourly rate, including:
- Location: Labour costs are often higher in larger cities where demand for skilled tradespeople is greater.
- Project Complexity: Intricate layouts, large-format tiles, or natural stone installations usually require more time and skill.
- Experience: A tiler with many years of experience may charge more because they can deliver high-quality results efficiently.
- Preparation Work: Jobs that require removing old tiles, repairing the subfloor, or waterproofing before installation will often cost more.
Average Hourly Price Range
For most residential projects, homeowners can expect hourly rates to fall within these general ranges:
- Entry-level tilers: Around $50 to $65 per hour.
- Experienced tilers: Around $65 to $85 per hour.
- Specialist tilers: Around $85 to $100 or more per hour for premium materials or complex installations.
These figures are intended as a general guide. The total cost of your project will also depend on how many hours the work takes and whether materials or extra services are included.
Apprentice Vs Experienced Tilers
The experience level of a tiler can make a noticeable difference to both pricing and workmanship.
An apprentice usually works under the supervision of a qualified tiler and may assist with preparation, measuring, mixing adhesives, and basic installation tasks. Their labour rate is generally lower because they are still developing their skills.
An experienced tiler brings years of practical knowledge to the job. They are often better equipped to handle challenging layouts, uneven surfaces, waterproofing requirements, and precise tile alignment. Paying a higher hourly rate can be worthwhile if it leads to fewer mistakes, a better finish, and less risk of future repairs.
Residential Vs Commercial Work
Residential tiling projects often include bathrooms, kitchens, laundries, living areas, patios, and entryways. These jobs usually involve smaller spaces and more attention to appearance and finishing details.
Commercial tiling projects are often larger and may include offices, restaurants, retail stores, schools, or apartment developments. Commercial work may require additional planning, strict compliance with building requirements, and tighter project deadlines. Because of these added responsibilities, commercial tiling rates may differ from those charged for residential work.
Hourly Rate Vs Fixed Quote
Not every tiler charges in the same way. Some prefer an hourly rate, while others provide a fixed quote based on the entire project. Understanding the difference can help you choose the pricing method that best suits your job.
When Tilers Charge By The Hour
Hourly pricing is commonly used when the amount of work cannot be accurately estimated at the beginning of the project. It is also common for smaller jobs where the total labour time is expected to be relatively short.
Examples include:
- Small repairs: Replacing cracked or loose tiles.
- Minor alterations: Extending an existing tiled area.
- Maintenance Work: Fixing grout, resealing joints, or carrying out small touch-ups.
- Uncertain Scope: Projects where hidden damage or extra preparation may only become apparent once work begins.
An hourly rate provides flexibility if unexpected issues arise during the job.
When A Fixed Project Price Is More Common
A fixed quote is generally provided when the project has a clearly defined scope and the tiler can accurately estimate the labour, materials, and timeframe before work begins.
Examples include:
- Complete Bathroom Renovations: Full wall and floor tiling with agreed specifications.
- Kitchen Splashbacks: Standard installations with a known tile layout.
- New-home Construction: Tiling completed according to approved building plans.
- Large-floor Installations: Open spaces where measurements and preparation requirements are easy to assess.
A fixed quote gives homeowners greater certainty because the agreed labour cost usually remains the same unless the project scope changes.
Pros And Cons Of Each Pricing Method
Both pricing methods have advantages, depending on the type of work being completed.
Hourly Rate
- Best For: Small jobs, repairs, or projects with uncertain conditions.
- Advantages: Flexible if additional work becomes necessary and suitable for tasks that are difficult to estimate.
- Disadvantages: The final labour cost can vary if the project takes longer than expected.
Fixed Quote
- Best For: Renovations, new installations, and projects with clearly defined requirements.
- Advantages: Provides a clear budget before work begins and reduces uncertainty about labour costs.
- Disadvantages: Changes to the project after work starts may result in additional charges or a revised quote.
Before accepting any quote, ask the tiler what is included in the price, whether GST is included, and if extra work will be charged separately. Having these details confirmed in writing helps prevent misunderstandings and makes it easier to compare different quotes fairly.
Understanding how tilers charge for their work allows you to budget more accurately and choose the pricing option that fits your project. Comparing detailed quotes, asking the right questions, and focusing on quality workmanship can help you achieve a result that offers lasting value rather than simply choosing the lowest hourly rate.

What Can Affect A Tiler’s Hourly Rate?
The hourly rate a tiler charges is influenced by more than just the time spent laying tiles. Every project has different requirements, and factors such as the size of the job, the type of tiles, the condition of the surface, the location, and the tiler’s experience all play a role in the final labour cost. Understanding these factors can help you compare quotes more confidently and set a realistic budget before work begins.
Job Size And Project Complexity
The size and complexity of a tiling project have a direct impact on the amount of labour required. While smaller jobs may seem quicker, they can still involve setup time, material preparation, and cleanup. Larger or more detailed projects often require additional planning, precision, and specialised techniques.
- Small Repairs: Replacing a few damaged tiles or repairing cracked grout usually takes less time, but many tilers have a minimum charge to cover travel, setup, and labour.
- Large Renovations: Renovating an entire bathroom, kitchen, or living area involves more preparation, cutting, and installation, which increases the overall labour time.
- New Builds: New homes often provide clean, prepared surfaces that allow tilers to work more efficiently. Even so, larger floor areas and multiple rooms can still require several days of work.
- Intricate Tile Patterns: Designs such as herringbone, basket weave, diagonal layouts, or decorative borders require careful measuring and extra cutting, making them more time-consuming than standard straight-laid tiles.
Type Of Tiles Being Installed
Not all tiles are installed in the same way. Some materials are easier to cut and handle, while others demand greater skill and more specialised tools. The type of tile you choose can influence both the labour time and the hourly rate.
- Ceramic Tiles: Ceramic tiles are generally easier to cut and install, making them one of the more affordable options for labour.
- Porcelain Tiles: Porcelain is denser and harder than ceramic, so it often requires stronger cutting equipment and additional installation time.
- Natural Stone: Materials such as marble, slate, granite, and travertine require careful handling, accurate cutting, and proper sealing to achieve a professional finish.
- Mosaic Tiles: Mosaic sheets contain many small pieces that need precise alignment to create consistent joints and a neat appearance.
- Large-format Tiles: Oversized tiles require careful levelling to prevent uneven edges and may need two people to handle them safely during installation.
Surface Preparation Requirements
A well-prepared surface is one of the most important parts of any successful tiling project. If the existing surface is not suitable, additional preparation will be needed before any tiles can be installed. This extra work increases labour time but helps create a stronger and longer-lasting result.
- Removing Old Tiles: Taking up existing tiles, adhesive, and debris can be labour-intensive, particularly if the old flooring is firmly bonded to the surface.
- Waterproofing: Wet areas such as bathrooms, showers, and laundries often require waterproof membranes before tiling begins to help protect the building from moisture damage.
- Levelling Uneven Floors: Uneven concrete or timber floors may need self-levelling compounds or other corrective work to create a flat and stable base.
- Subfloor Repairs: Damaged, loose, or weakened subfloors should be repaired before installation to reduce the risk of cracked tiles or grout in the future.
Location Within New Zealand
Where your property is located can also affect tiling costs. Labour rates often reflect local demand, travel requirements, and the cost of doing business in different parts of New Zealand.
- Regional Pricing Differences: Larger cities often have higher labour rates due to increased operating costs and stronger demand for skilled tradespeople.
- Travel Costs: Properties outside normal service areas may incur additional travel charges or call-out fees, especially for smaller jobs.
- Urban Vs Rural Projects: Urban locations usually offer easier access to suppliers and shorter travel times, while rural projects may involve longer journeys and additional transport expenses.
Experience And Qualifications
An experienced tiler may charge a higher hourly rate, but that experience often results in better workmanship, greater efficiency, and fewer costly mistakes. Choosing a qualified professional can provide better long-term value than selecting the lowest quote.
- Years Of Experience: Experienced tilers have worked on a wide range of projects and are often able to solve unexpected problems more quickly and accurately.
- Licensed Or Certified Professionals: Depending on the scope of the work, hiring a tiler with recognised qualifications or relevant certifications can provide extra confidence in the quality of the installation.
- Reputation And Workmanship: Positive customer reviews, completed projects, and a strong reputation for reliable workmanship are good indicators that a tiler consistently delivers quality results.
Understanding what affects a tiler’s hourly rate makes it easier to evaluate quotes and choose the right professional for your project. Looking beyond the hourly price and considering the scope of work, materials, and experience can help you achieve a high-quality finish that offers lasting value.
How Much Does A Typical Tiling Project Cost?
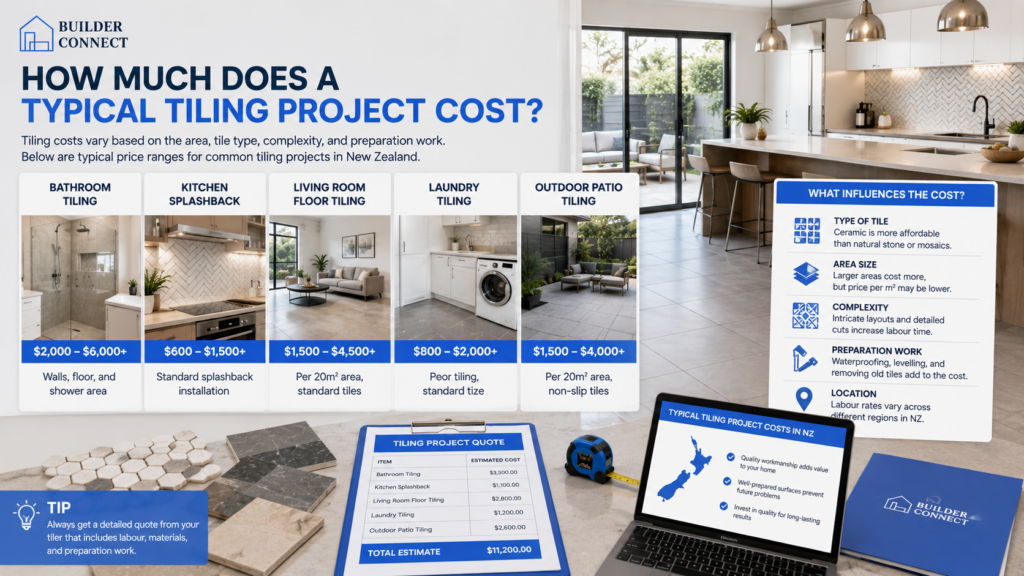
The total cost of a tiling project depends on more than just the hourly labour rate. The size of the area, the type of tiles you choose, the condition of the surface, and the complexity of the installation all influence the final price. While some projects can be completed in a single day, others may take several days, which naturally increases labour costs. Understanding these factors will help you set a realistic budget and compare quotes with confidence.
Bathroom Tiling
Bathroom tiling is often one of the more expensive residential tiling projects because it usually involves several surfaces, detailed cuts, and waterproofing requirements. Walls, floors, shower areas, and niches all require careful planning and precise installation to achieve a durable, professional finish.
For example, if a tiler charges $75 per hour and the bathroom installation takes 24 hours, the labour cost alone would be around $1,800 before materials and waterproofing are added. If the project includes removing old tiles or repairing damaged surfaces, the overall cost will increase because these tasks require additional labour.
Common factors that affect bathroom tiling costs include:
- Waterproofing: Proper waterproofing is essential in wet areas and usually adds both labour and material costs.
- Tile Size: Small mosaic tiles or intricate patterns take longer to install than standard-sized tiles.
- Surface Preparation: Uneven walls or floors may need levelling before tiling begins.
- Room Layout: Bathrooms with multiple corners, fixtures, and fittings require more detailed cutting and installation.
Kitchen Splashbacks
Kitchen splashbacks are generally smaller projects, making them more affordable than full-room installations. Even though the tiled area is limited, careful measuring and accurate cuts around power outlets, cupboards, and windows still require time and attention.
As an example, a splashback that takes six hours to complete at an hourly rate of $70 would result in approximately $420 in labour. Choosing decorative layouts such as herringbone or stacked mosaics can increase installation time and raise the total labour cost.
Several factors can influence the final price:
- Tile Pattern: Decorative layouts usually require more measuring and cutting.
- Cutting Around Fixtures: Extra time may be needed around electrical outlets and cabinetry.
- Tile Material: Glass and natural stone tiles often require specialised tools and greater care.
- Access To The Work Area: A clear workspace allows the installation to progress more efficiently.
Floor Tiling
Floor tiling costs vary depending on the size of the room and the condition of the existing floor. Larger areas may benefit from greater installation efficiency, but they also require more materials and longer working hours.
For example, tiling an open-plan living area may take 30 hours. At an hourly labour rate of $80, labour costs would total about $2,400 before tile supply, adhesives, grout, and trims are included.
Labour costs may increase if the project involves:
- Old Floor Removal: Removing existing flooring adds time before installation can begin.
- Subfloor Repairs: Damaged or uneven surfaces need attention to achieve a long-lasting finish.
- Large-format Tiles: Bigger tiles require careful handling and accurate levelling.
- Complex Room Shapes: Multiple corners or angled walls increase cutting and fitting time.
Laundry And Entryways
Laundry rooms and entryways are usually smaller than kitchens or living spaces, but they often require durable finishes that can withstand regular foot traffic and moisture. These areas may also involve working around cabinetry, doors, or plumbing fixtures.
For instance, if a laundry floor takes eight hours to complete at $75 per hour, labour would cost approximately $600. If the existing flooring must be removed first, the overall project cost will be higher due to the extra preparation work.
The final price often depends on:
- Existing Floor Condition: Clean, level surfaces reduce installation time.
- Moisture Protection: Some laundry areas may require additional waterproofing.
- Tile Selection: Premium materials can increase both labour and material costs.
- Room Accessibility: Tight spaces may slow down installation.
Outdoor Tiling
Outdoor tiling often requires additional preparation because the finished surface must handle changing weather conditions, drainage, and temperature changes. Proper installation is important to reduce the risk of loose tiles or water-related issues over time.
As an example, an outdoor patio project requiring 35 hours of labour at $85 per hour would result in approximately $2,975 in labour costs. Projects that include extensive site preparation or sloping surfaces can take longer and increase the overall budget.
Factors that commonly affect outdoor tiling costs include:
- Ground Preparation: Existing concrete or paving may need repairs before tiling starts.
- Drainage Requirements: Correct falls help prevent water from pooling on the finished surface.
- Weather-resistant Materials: Outdoor tiles and adhesives are designed for external conditions and may cost more.
- Project Size: Larger entertainment areas require more labour and materials.
Understanding how hourly labour affects different tiling projects makes it easier to estimate your budget and compare quotes fairly. Looking beyond the hourly rate and considering the full scope of work will help you choose a tiler who delivers quality workmanship and long-term value.
What’s Usually Included In A Tiler’s Hourly Rate?
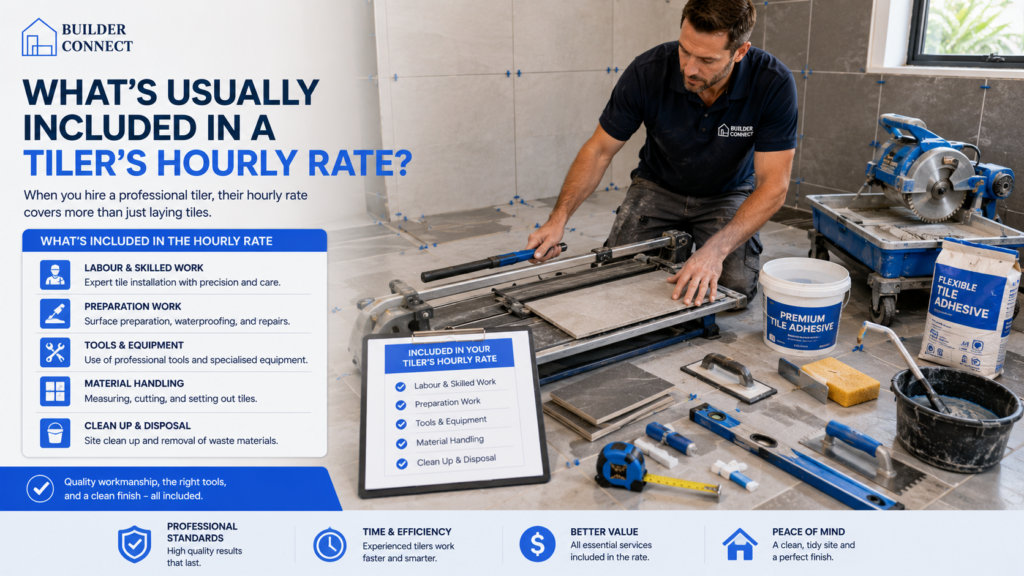
Before comparing quotes, it helps to understand what a tiler’s hourly rate usually covers. While every contractor may price their services a little differently, most hourly rates include the labour needed to complete the installation and the use of standard tools. Some materials and extra services are charged separately, so asking for a detailed quote can help you avoid unexpected costs and make it easier to compare different tilers.
Labour
Labour is the main part of a tiler’s hourly rate. It covers the time and skill required to measure, plan, cut, lay, and finish tiles correctly. An experienced tiler will also make sure the finished surface is level, evenly spaced, and properly aligned.
The amount of labour needed depends on the size and complexity of the project. A simple splashback can often be completed much faster than a bathroom with multiple corners, niches, or patterned tiles. Larger-format tiles and natural stone may also require extra care, which can increase the time needed for installation.
Basic Tools And Equipment
Most tilers include the use of their standard tools and equipment as part of their hourly rate. These tools are necessary for accurate installation and professional results.
Common tools may include:
- Tile cutters: Used to make straight and precise cuts.
- Wet saws: Ideal for cutting porcelain, stone, and other hard tile materials.
- Levels: Help ensure the finished surface is even and properly aligned.
- Trowels: Used to spread adhesive evenly across the surface.
- Spacers: Keep grout lines consistent throughout the installation.
- Measuring tools: Allow accurate planning and tile placement.
Specialised equipment that is only needed for certain projects may be charged separately, particularly if it requires additional setup or rental.
Site Preparation
Basic site preparation is often included in a tiler’s hourly rate when the surface is already in good condition. This usually involves checking the area, cleaning away dust or debris, and making sure the surface is ready for tile installation.
Minor preparation tasks may include:
- Surface cleaning: Removing dirt and loose material before tiling begins.
- Checking levels: Identifying small uneven areas that could affect the finished result.
- Layout planning: Measuring and marking the best tile layout to reduce unnecessary cuts.
- Protecting nearby areas: Covering surrounding surfaces to help keep the work area clean.
If the existing floor or wall needs significant repairs, levelling, or waterproofing before tiling can begin, these services are generally priced separately.
Cleanup After Installation
A professional tiler will usually include a basic cleanup once the installation is complete. This helps leave the work area tidy and ready for the next stage of your project.
Standard cleanup often includes:
- Removing tile offcuts: Collecting leftover pieces created during installation.
- Cleaning excess grout: Wiping away grout residue from tile surfaces.
- Packing away tools: Removing equipment from the work area.
- General site tidy-up: Sweeping or vacuuming loose dust and debris.
A basic cleanup does not usually include the removal of demolition waste or large amounts of construction debris.
What May Cost Extra?
Not every part of a tiling project is included in the hourly labour rate. Some services and materials are commonly charged as additional items because they require extra time, specialised products, or disposal costs.
These may include:
- Tile removal: Removing old tiles, adhesive, and underlay before new tiles can be installed.
- Waterproofing: Applying certified waterproofing systems in wet areas such as bathrooms and laundries.
- Tile supply: Purchasing the tiles themselves unless they are supplied by the homeowner.
- Adhesives And Grout: The products needed to securely install and finish the tiles.
- Waste disposal: Transporting and disposing of old tiles, rubble, and other construction waste at approved facilities.
Before accepting a quote, ask the tiler to explain which items are included in the hourly rate and which are charged separately. A detailed written quote makes it easier to compare prices and understand the total cost of your tiling project.
Knowing what is included in a tiler’s hourly rate helps you budget more accurately and reduces the chance of unexpected charges. Taking the time to review a detailed quote will give you a clearer picture of the total project cost and help you choose a tiler who offers both quality workmanship and good value.
Is It Better To Hire The Cheapest Tiler?
Choosing the lowest quote may seem like an easy way to save money, but the cheapest option is not always the best value. A well-installed tile surface should last for many years, so the quality of the workmanship often matters more than the initial price. Looking beyond the hourly rate and considering experience, materials, and attention to detail can help you avoid costly problems and achieve a better long-term result.
Why Lower Prices Can Cost More Later
A very low quote can sometimes mean important parts of the job have been left out or rushed. While not every affordable tiler delivers poor work, it is worth understanding exactly what is included before making your decision.
Poor preparation is one of the most common causes of tiling problems. If the surface is not cleaned, levelled, or waterproofed where required, tiles may loosen, crack, or become uneven over time. Fixing these issues often costs much more than hiring an experienced tiler from the beginning.
A lower price may also reflect the use of lower-quality materials or shortcuts during installation. Adhesives, grout, waterproofing systems, and expansion joints all play an important role in the durability of a tiled surface.
Some low-cost quotes may exclude work that is essential for the project, leading to unexpected costs later.
- Surface Preparation: Confirm whether levelling, repairs, or waterproofing are included in the quoted price.
- Materials: Check if adhesives, grout, trims, and sealants are part of the estimate or charged separately.
- Waste Removal: Ask whether removing old tiles and disposing of construction waste is included.
- Guarantees: Find out if the tiler offers a workmanship guarantee for completed work.
Paying a fair price for quality workmanship often reduces the chance of repairs, replacement tiles, or water damage in the future.
What Good Workmanship Looks Like
Professional tiling is about more than placing tiles neatly. A skilled tiler takes time to prepare the surface properly, plans the tile layout carefully, and finishes every detail to a high standard.
Signs of good workmanship include straight grout lines, even spacing, smooth transitions between surfaces, and neatly finished edges. Tiles should sit flat without noticeable lippage, where one tile edge is higher than another. In wet areas, proper waterproofing and drainage are equally important to help prevent moisture-related problems.
Experienced tilers also communicate clearly throughout the project. They explain the work involved, discuss any challenges before starting, and provide realistic timelines so you know what to expect.
When reviewing previous projects, look for consistency rather than just attractive photos. Well-finished corners, accurate cuts around fixtures, and clean grout lines often indicate careful attention to detail.
Questions To Ask Before Hiring A Tiler
Taking a few minutes to ask the right questions can help you compare tilers based on value rather than price alone. A professional contractor should be happy to explain their process and answer your concerns.
Consider asking questions such as:
- Experience: How many years have you been installing this type of tile?
- Similar Projects: Have you completed projects like mine before?
- Written Quote: What exactly is included in the quoted price?
- Preparation Work: Will the existing surface need repairs, levelling, or waterproofing?
- Materials: Which adhesives, grout, and waterproofing products do you recommend?
- Timeline: How long is the project expected to take?
- Workmanship Guarantee: Do you provide a guarantee on your installation?
- References: Can you provide examples of recent work or customer reviews?
These questions can give you a clearer picture of the tiler’s experience, communication, and commitment to quality. Comparing detailed quotes and asking thoughtful questions often leads to a better decision than simply choosing the lowest hourly rate.
Choosing a tiler based on experience, workmanship, and the quality of their quote can provide better value than focusing on price alone. A well-completed tiling job is an investment that can improve the appearance, durability, and value of your home for many years.

How To Get An Accurate Tiling Quote
Getting an accurate tiling quote starts with providing clear and complete information. The more details you can share with a tiler before work begins, the more reliable the estimate will be. This helps you avoid unexpected costs, compare quotes fairly, and choose the right professional for your project. Whether you’re renovating a bathroom, updating a kitchen splashback, or installing new floor tiles, taking a few extra steps before requesting a quote can save both time and money.
Measure The Area
Before contacting a tiler, measure the area that needs to be tiled. While many professionals will confirm measurements during a site visit, having approximate dimensions helps them provide a more accurate estimate from the start.
If possible, note the length and width of each wall or floor, as well as any areas that will not require tiles, such as windows, doors, or built-in cabinets. If your project includes multiple rooms, list each area separately.
You should also mention any unusual features, such as steps, curved walls, or shower niches. These details often require extra cutting and installation time, which can affect the final labour cost.
- Measure carefully: Record the approximate square metres to help the tiler estimate labour and material requirements.
- Include all tiled areas: Don’t forget splashbacks, shower walls, entryways, or outdoor spaces if they are part of the project.
- Note special features: Curves, corners, drains, and built-in fixtures may increase the time needed for installation.
Choose Your Tiles Early
Selecting your tiles before requesting quotes makes it easier for a tiler to estimate the work accurately. Different tile materials, sizes, and finishes require different installation methods and levels of skill.
For example, large-format tiles often need extra care to achieve a flat finish, while natural stone may require sealing before or after installation. Mosaic tiles can also take longer because they involve more detailed placement and grouting.
Providing details about your chosen tiles allows the tiler to recommend suitable adhesives, grout, and installation techniques while giving you a more realistic price.
- Know your tile type: Ceramic, porcelain, natural stone, and mosaic tiles each have different installation requirements.
- Confirm tile size: Larger tiles may require additional preparation and specialised installation techniques.
- Ask about material suitability: A professional tiler can advise whether your selected tiles are suitable for the intended space.
Explain The Scope Of Work
A clear description of the project helps prevent misunderstandings and unexpected charges later. Let the tiler know exactly what work needs to be completed rather than assuming every task is included.
For example, explain whether existing tiles need to be removed, if waterproofing is required, or if the surface needs levelling before installation begins. These preparation tasks often take as much time as laying the tiles themselves.
You should also mention your preferred layout, grout colour, tile pattern, and any finishing details. The more information you provide, the easier it is for the tiler to prepare a detailed and accurate quote.
- Describe the full project: Include demolition, preparation, installation, grouting, and clean-up requirements.
- Mention site conditions: Uneven floors, damaged walls, or difficult access may affect labour costs.
- Share your design preferences: Patterns such as herringbone or diagonal layouts generally require more time than straight-set designs.
Compare Multiple Quotes
Requesting several quotes allows you to understand the typical tiler rate per hour NZ and compare the value offered by different professionals. While price is important, it should not be the only factor in your decision.
Review each quote carefully to see what is included. One tiler may include surface preparation and clean-up, while another may charge extra for those services. Comparing the full scope of work helps you make a fair comparison.
Take time to check customer reviews, ask about previous projects, and confirm expected completion times. Choosing an experienced tiler who provides a detailed quote can often deliver better long-term value than selecting the lowest price.
- Review what’s included: Compare labour, preparation, materials, and any additional charges.
- Check experience: Ask about similar projects and request examples of recent work if available.
- Look beyond price: Clear communication, quality workmanship, and detailed quotes often provide better value over the life of the installation.
Taking the time to prepare before requesting quotes can make the entire tiling process smoother. Clear measurements, early tile selection, and detailed project information help tilers provide accurate pricing, giving you greater confidence when comparing quotes and planning your renovation budget.

Ways To Save Money On Tiling Without Sacrificing Quality
Keeping your tiling project within budget does not mean you have to settle for poor workmanship or low-quality materials. With careful planning and a few smart decisions, you can reduce costs while still achieving a durable and attractive finish. The key is to focus on choices that lower unnecessary expenses without affecting the quality of the installation.
Buy Materials During Sales
Purchasing tiles and installation materials during seasonal sales or clearance events can make a noticeable difference to your overall budget. Many flooring and home improvement suppliers offer discounts throughout the year, especially when new product ranges are released.
Before buying, confirm that enough stock is available to complete your project. Purchasing extra tiles from the same batch is also a good idea, as matching colours and patterns can be difficult if replacements are needed later.
- Compare Prices: Check several suppliers before making a purchase to find the best value.
- Buy Extra Tiles: Order around 10% more tiles than needed to allow for cuts, breakages, and future repairs.
- Ask About Bulk Discounts: Larger orders may qualify for lower pricing or promotional offers.
- Choose Quality Products: Well-made tiles often last longer and can reduce future maintenance costs.
Keep The Tile Layout Simple
Complex tile patterns often require more cutting, careful measuring, and additional labour. A straightforward layout is usually quicker to install, helping reduce labour costs while still creating a clean and modern appearance.
Simple layouts also produce less material waste because fewer tiles need to be trimmed around corners or obstacles. This can help lower both material and installation expenses.
- Use Standard Patterns: Straight or stacked layouts are generally faster to install than intricate designs.
- Select Standard Tile Sizes: Common tile sizes are often easier to work with and produce less waste.
- Reduce Decorative Features: Limiting borders, inserts, and feature strips can help control labour costs.
- Discuss Layout Options: Ask your tiler which design provides the best balance between appearance and budget.
Prepare The Space Before The Tiler Arrives
Completing simple preparation tasks before the tiler begins work can reduce the amount of time spent on site. Since labour is often charged by the hour, even small time savings may lower the total project cost.
Clear communication with your tiler is important before preparing the area. Some tasks should only be completed after receiving professional advice to avoid creating extra work.
- Remove Furniture: Clear the room to give the tiler easy access to the work area.
- Protect Valuables: Move fragile items and decorations to prevent accidental damage.
- Provide Easy Access: Make sure entrances and pathways are free from obstacles.
- Confirm Preparation Requirements: Ask the tiler which tasks you can safely complete before work begins.
Combine Multiple Tiling Jobs
If you are planning more than one tiling project, completing them at the same time can often reduce overall costs. Hiring a tiler for several areas in one visit may lower travel expenses, minimise setup time, and improve scheduling efficiency.
For example, renovating a bathroom, laundry, and kitchen splashback together may be more cost-effective than booking separate installations months apart.
- Reduce Call-Out Costs: Combining projects may avoid paying multiple travel or setup charges.
- Improve Labour Efficiency: The tiler can complete several areas without repeated site visits.
- Order Materials Together: Purchasing all materials at once may help you secure better pricing.
- Simplify Project Planning: Completing multiple spaces in one stage can reduce disruption around your home.
Making thoughtful decisions before your project starts can help you manage your tiling budget without sacrificing quality. By planning ahead, comparing options, and working closely with an experienced tiler, you can achieve a professional finish that delivers lasting value for your home.

Common Mistakes That Can Increase Tiling Costs
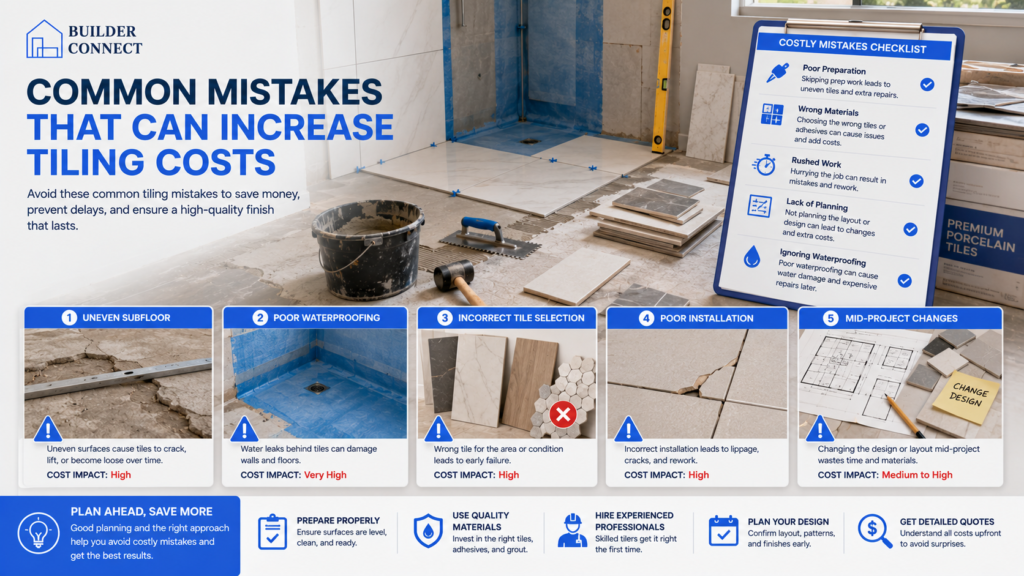
Even a well-planned tiling project can become more expensive than expected if a few common mistakes are overlooked. Many extra costs come from decisions made before the first tile is laid, such as selecting unsuitable materials or skipping important preparation work. Understanding these mistakes can help you plan more effectively, compare quotes with confidence, and keep your project on budget while achieving a high-quality finish.
Choosing The Wrong Tiles
Not every tile is suitable for every space. Choosing tiles based only on appearance can lead to higher installation costs, additional labour, or future repairs if the material does not match the intended use.
Large-format tiles, natural stone, and intricate mosaic designs often take longer to install than standard ceramic tiles. Some materials also require special adhesives, sealers, or cutting tools, which can increase both labour and material costs.
Before purchasing tiles, think about where they will be installed and how the space will be used.
- Room suitability: Choose tiles that are designed for the specific area, such as moisture-resistant tiles for bathrooms or durable tiles for high-traffic floors.
- Installation complexity: Decorative patterns and large-format tiles usually require more precise installation, increasing labour time.
- Maintenance needs: Some natural stone products need regular sealing and ongoing care, which adds to long-term ownership costs.
- Waste allowance: Buying the wrong quantity may lead to delays or additional orders if matching tiles become unavailable.
Taking time to select the right tiles at the beginning can help avoid unnecessary expenses later in the project.
Ignoring Surface Preparation
A strong, level surface is one of the most important parts of a successful tiling project. Even the highest-quality tiles cannot perform well if they are installed over an uneven, damaged, or unstable base.
Professional tilers often spend considerable time preparing the surface before installation begins. This may include removing old flooring, repairing damaged areas, levelling the subfloor, or applying waterproofing in wet areas.
Skipping these steps can result in loose tiles, cracked grout, uneven finishes, or water damage that requires costly repairs.
Common preparation work may include:
- Removing existing tiles: Old adhesives and damaged tiles should be removed to create a clean surface.
- Levelling uneven floors: A flat base helps achieve straight tile lines and reduces the risk of movement.
- Repairing damaged substrates: Weak or cracked surfaces should be fixed before new tiles are installed.
- Applying waterproofing: Bathrooms, laundries, and other wet areas often require waterproof membranes to protect the structure beneath the tiles.
Investing in proper preparation helps create a longer-lasting installation and reduces the chance of expensive problems developing after the project is complete.
Hiring Based Only On Price
Choosing the lowest quote may seem like an easy way to save money, but it can sometimes lead to higher costs if the workmanship does not meet professional standards.
An unusually low quote may exclude important work such as surface preparation, waterproofing, waste removal, or finishing details. In some cases, poor installation can lead to cracked tiles, uneven surfaces, or water leaks that require the entire area to be repaired.
When comparing quotes, consider more than the hourly rate or total price.
- Experience: Look for tilers with a proven history of completing similar projects.
- Detailed quotes: Make sure the quotation clearly explains what is included and what may cost extra.
- Customer reviews: Feedback from previous clients can provide valuable insight into reliability and workmanship.
- Communication: A professional tiler should answer questions clearly and explain the installation process before work begins.
Paying slightly more for experienced workmanship often provides better value than paying for repairs caused by poor-quality installation.
Changing The Design Mid-Project
Changing your design after work has started is one of the quickest ways to increase the total cost of a tiling project.
A new tile layout, different tile size, or revised pattern may require additional cutting, extra materials, and more labour. Changes can also delay the project if replacement materials need to be ordered or if completed work must be removed and redone.
Planning your design before installation begins helps reduce unexpected costs and keeps the project moving smoothly.
Helpful ways to avoid design changes include:
- Finalise your tile selection: Confirm colours, sizes, and finishes before ordering materials.
- Approve the layout: Review the proposed tile pattern with your tiler before installation starts.
- Check material availability: Ensure enough matching tiles are available before work begins.
- Discuss expectations early: Clear communication helps prevent misunderstandings that can lead to costly changes.
Making decisions early gives both you and your tiler a clear plan to follow, helping the project stay on schedule and within budget.
Avoiding these common mistakes can make a significant difference to the overall cost and success of your tiling project. Careful planning, choosing suitable materials, and working with an experienced tiler will help you achieve a durable, attractive finish while reducing the risk of unexpected expenses.
References
- Tiler Rates & Pricing Guide 2025 NZ | AD Tiling
https://addecor.co.nz/blogs/news/tiler-rates-pricing-guide-2025-what-tilers-charge-in-new-zealand-ad-tiling - How Much Do Tilers Cost in New Zealand? (2025 Pricing Guide) | ServiceTasker NZ
https://servicetasker.co.nz/cost-guides/how-much-do-tilers-cost-in-new-zealand - How Much Does a Tiler Cost in New Zealand? | Dakom Tiling
https://dakom.co.nz/how-much-does-a-tiler-cost-in-new-zealand/
FAQs: About Tiler Rate Per Hour NZ
Conclusion
Understanding the average tiler rate per hour in NZ is about more than knowing the hourly cost. The final price can vary based on the tiler’s experience, the size and complexity of the project, the type of tiles being installed, and any preparation work needed before installation begins. Comparing detailed quotes allows you to see exactly what is included, making it easier to choose the best value rather than simply the lowest price. Investing in skilled workmanship can help prevent issues such as uneven tiles, poor waterproofing, or early repairs, saving you money over the long term. If you’re planning a tiling project, speak with a reputable local tiler to discuss your needs, ask questions, and request a detailed quote so you can move forward with confidence.
Find A Professional Tiling Company Near You!
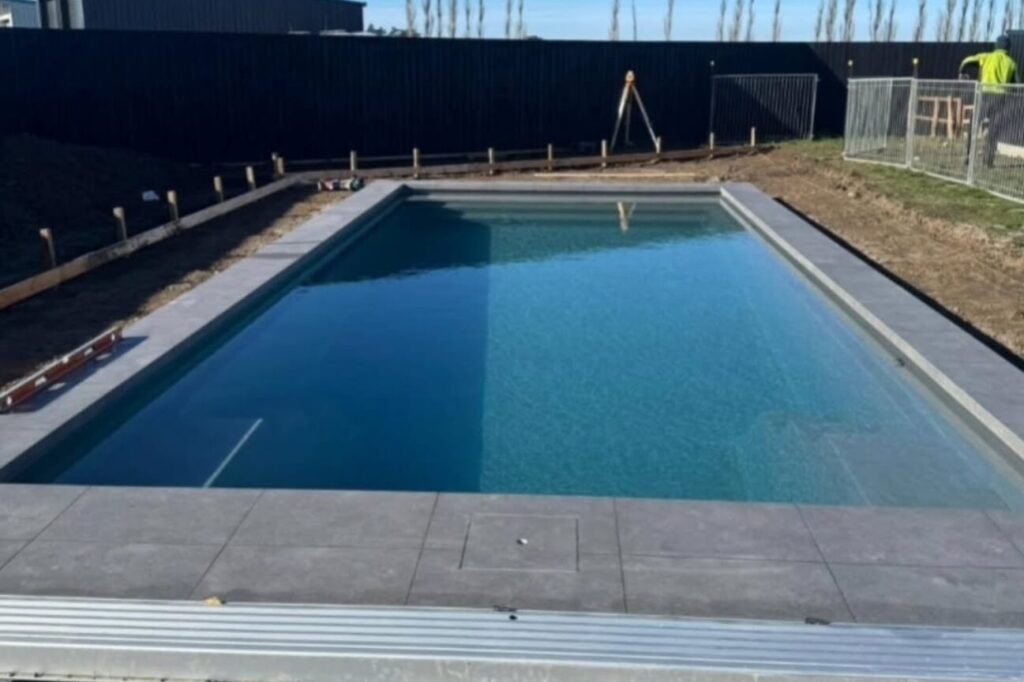
Christchurch Pool Tiling Service
Call now: 03 668 1355 Main Menu ServicesReviewsBenefitsOur Work Call For Instant Quote 03 668…

Mangawhai Tiling Service
Call now: 09 884 0833 Main Menu ServicesReviewsBenefitsOur Work Call For Instant Quote 09 884…
Auckland Tiling Service
Call now: 09 884 0833 Main Menu ServicesReviewsBenefitsOur Work Call For Instant Quote 09 884…
Whangarei Tiling Service
Call now: 09 873 3988 Main Menu ServicesReviewsBenefitsOur Work Call For Instant Quote 09 873…
Christchurch Tiling Service
Call now: 03 668 1355 Main Menu ServicesReviewsBenefitsOur Work Call For Instant Quote 03 668…

About the Author:
Mike Veail is a recognized digital marketing expert with over 6 years of experience in helping tradespeople and small businesses thrive online. A former quantity surveyor, Mike combines deep industry knowledge with hands-on expertise in SEO and Google Ads. His marketing strategies are tailored to the specific needs of the trades sector, helping businesses increase visibility and generate more leads through proven, ethical methods.
Mike has successfully partnered with numerous companies, establishing a track record of delivering measurable results. His work has been featured across various platforms that showcase his expertise in lead generation and online marketing for the trades sector.
Learn more about Mike's experience and services at https://theleadguy.online or follow him on social media: