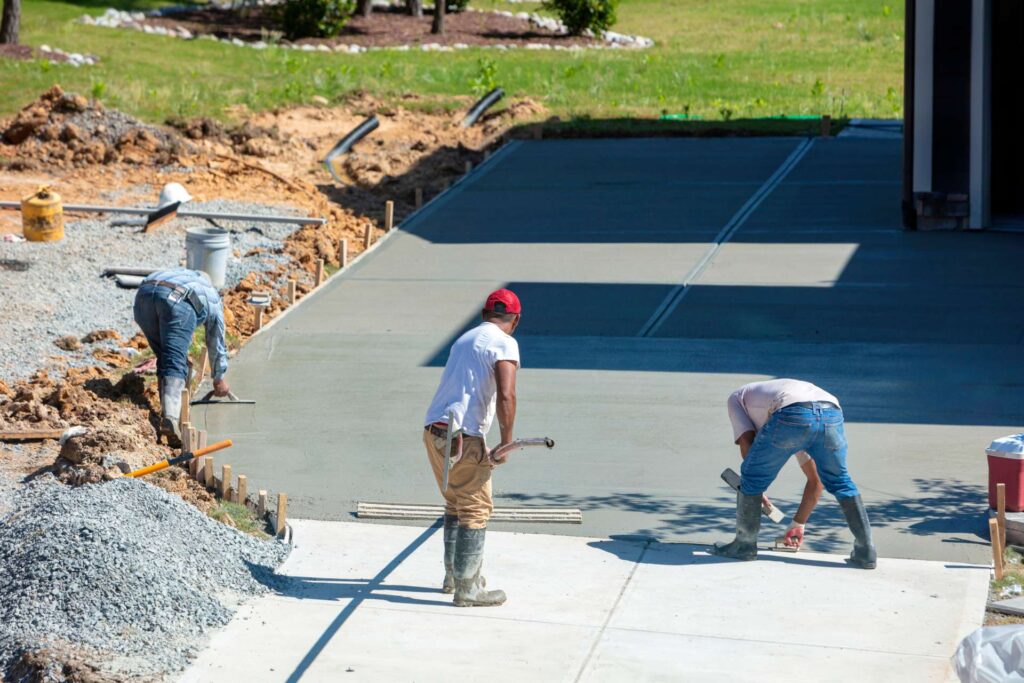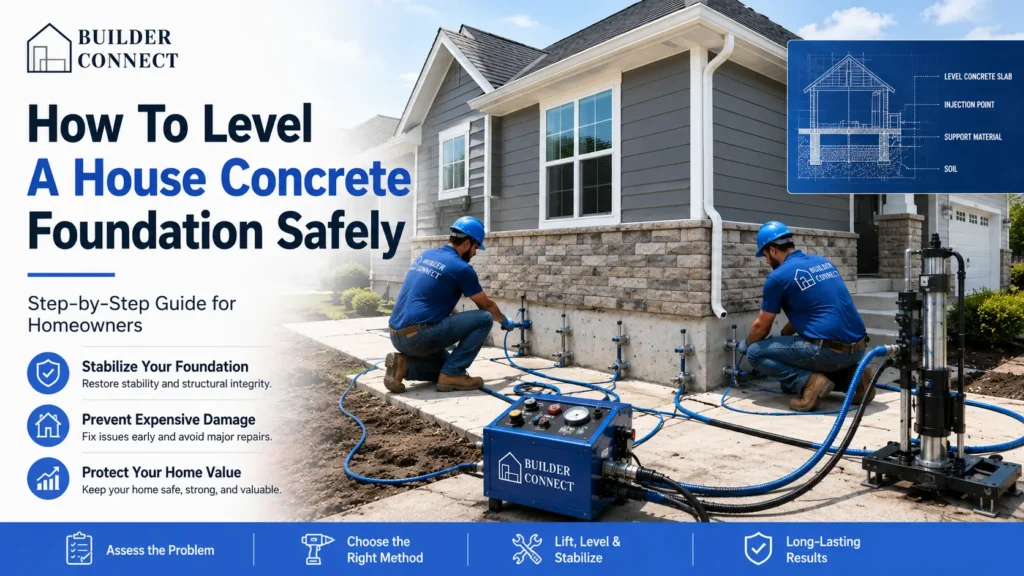
Welcome to your complete guide on how to level a house concrete foundation, where you’ll learn why foundations become uneven, how to identify the warning signs early, and the safest, most effective methods to restore stability to your home. Whether you’re dealing with minor settling or more serious structural shifts, understanding the right approach can help you avoid costly damage, protect your property value, and make informed decisions about DIY repairs versus professional solutions.
To level a house concrete foundation, first assess the cause and severity of settling, then use methods like slab jacking, polyurethane foam injection, or piering to lift and stabilize the structure. Minor issues may be DIY, but significant foundation movement typically requires professional repair for safety and long-term stability.
- What Causes A Concrete Foundation To Become Uneven?
- Signs Your Concrete Foundation Needs Leveling
- Can You Level A Concrete Foundation Yourself?
- Common Methods For Leveling A Concrete Foundation
- Tools And Materials You May Need
- Step-by-Step: How To Level A Concrete Foundation
- Cost Of Leveling A Concrete Foundation
- How Long Does Foundation Leveling Last?
- How To Prevent Future Foundation Problems
- Common Mistakes To Avoid When Leveling A Foundation
- References
- FAQs: About How To Level A House Concrete Foundation
- Conclusion
- Find A Professional Concrete Company Near You!
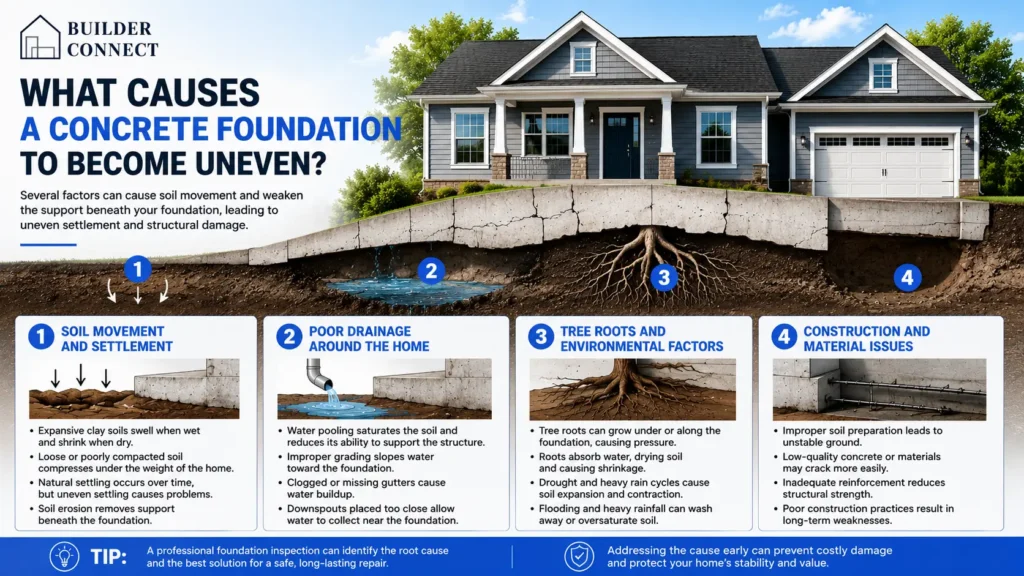
What Causes A Concrete Foundation To Become Uneven?
Understanding why a concrete foundation becomes uneven is essential before attempting any repair. Most foundation problems do not happen overnight but develop gradually due to a combination of soil conditions, moisture changes, and construction factors. Identifying the root cause helps you choose the right long-term solution instead of applying a temporary fix that may fail over time.
Soil Movement And Settlement
Soil behavior is one of the most common causes of foundation movement. Since your home sits directly on the ground, any shift beneath it can lead to uneven settling.
- Expansive clay soils: These soils swell when wet and shrink when dry, creating constant pressure changes under the foundation that lead to cracking and movement
- Loose or poorly compacted soil: If the soil was not properly compacted during construction, it may gradually compress under the weight of the home, causing sections to sink
- Natural settling over time: Even well-built homes experience some level of settling, but uneven settlement can occur if soil conditions vary across the property
- Soil erosion: Wind and water can slowly remove supporting soil, leaving gaps beneath the foundation and causing instability
Poor Drainage Around The Home
Water management plays a critical role in foundation health. When water is not directed away from the structure, it can weaken the soil and create uneven support.
- Water pooling near the foundation: Standing water saturates the soil, reducing its ability to support the structure and increasing the risk of sinking
- Improper grading: If the ground slopes toward the house instead of away from it, rainwater will consistently flow toward the foundation
- Clogged or missing gutters: Without proper drainage systems, roof runoff can accumulate around the base of the home
- Downspouts placed too close: Short or poorly positioned downspouts allow water to collect directly near the foundation instead of dispersing safely
Tree Roots And Environmental Factors
Natural environmental forces can also affect foundation stability, especially over long periods.
- Root pressure from large trees: Tree roots can grow beneath or alongside the foundation, exerting pressure that lifts or shifts sections of concrete
- Soil moisture imbalance from roots: Trees absorb significant amounts of water, which can dry out the surrounding soil and cause it to shrink
- Drought cycles: Extended dry periods cause soil contraction, while sudden rainfall leads to rapid expansion, creating stress on the foundation
- Flooding and heavy rainfall: Excess water can wash away soil or oversaturate it, both of which reduce stability and lead to uneven movement
Construction And Material Issues
In some cases, foundation problems stem from how the home was originally built or the materials used.
- Improper soil preparation: Skipping proper soil testing or compaction before construction can result in unstable ground conditions
- Low-quality concrete or materials: Weak or poorly mixed concrete may crack more easily under stress
- Inadequate reinforcement: Missing or insufficient steel reinforcement can reduce the foundation’s ability to handle shifting forces
- Poor construction practices: Rushed work or lack of proper inspection during construction can lead to long-term structural weaknesses
A concrete foundation rarely becomes uneven due to a single issue. More often, it is the result of multiple factors working together over time, which is why a careful inspection is always the first step toward a reliable and long-lasting repair.
Signs Your Concrete Foundation Needs Leveling
Before jumping into repairs, it’s critical to recognize the warning signs of an uneven or shifting foundation. These symptoms often start small but can quickly turn into serious structural issues if ignored. By understanding what to look for, you can take action early and avoid more expensive and complex repairs down the line.
Visible Cracks in Walls or Floors
Cracks are one of the most common and noticeable indicators of foundation movement. While not all cracks are serious, certain patterns can signal deeper structural problems.
- Hairline cracks: Small, thin cracks in drywall or concrete are often caused by normal settling, but they should still be monitored over time.
- Diagonal cracks: Cracks that run diagonally across walls or from the corners of doors and windows usually point to uneven foundation settlement.
- Widening cracks: If cracks grow larger or longer over time, this is a strong sign of ongoing movement that needs attention.
- Floor cracks: Cracks in concrete floors, especially those that are uneven or shifting, often indicate pressure from below due to soil movement.
Uneven or Sloping Floors
Floors that are no longer level can be a clear sign that the foundation beneath them has shifted. This issue may develop gradually, making it harder to notice at first.
- Subtle slope: You may feel a slight tilt when walking across a room or notice furniture leaning slightly.
- Rolling objects: Objects like balls or chairs moving on their own can reveal uneven surfaces.
- Soft or bouncy spots: Areas that feel unstable underfoot may indicate weakened support beneath the floor.
- Visible dips: In more advanced cases, you may see dips or waves forming across the floor surface.
Doors and Windows Sticking or Misaligned
When a foundation shifts, it can distort the shape of door and window frames, causing them to function improperly.
- Sticking doors: Doors that suddenly become difficult to open or close may be reacting to frame misalignment.
- Uneven gaps: Noticeable gaps around door or window edges often signal structural movement.
- Latch issues: Doors that no longer latch properly can indicate that the frame has shifted out of square.
- Window resistance: Windows that jam or refuse to stay open may be affected by pressure from a shifting foundation.
Gaps Between Walls, Ceilings, or Floors
As the foundation moves, it can pull different parts of the structure apart, creating visible separations.
- Wall-ceiling gaps: Small separations where walls meet ceilings can grow over time if the issue is not addressed.
- Baseboard separation: Gaps between baseboards and floors often indicate movement below the surface.
- Cabinet detachment: Built-in cabinets or fixtures pulling away from walls can signal structural shifting.
- Trim misalignment: Decorative trim that no longer lines up properly may reflect underlying foundation problems.
Water Intrusion or Drainage Problems
Water is one of the leading causes of foundation damage, and poor drainage can accelerate uneven settling.
- Pooling water: Standing water near the foundation can weaken the soil and lead to sinking or shifting.
- Moisture in basements: Damp walls or floors in basements or crawl spaces often point to drainage issues.
- Erosion signs: Washed-out soil around the home can reduce support under the foundation.
- Mold or mildew: Persistent moisture can lead to mold growth, which is both a health concern and a sign of ongoing water intrusion.
Catching these signs early gives you a much better chance of fixing the problem before it becomes a major structural concern, saving both time and money while protecting the long-term stability of your home.

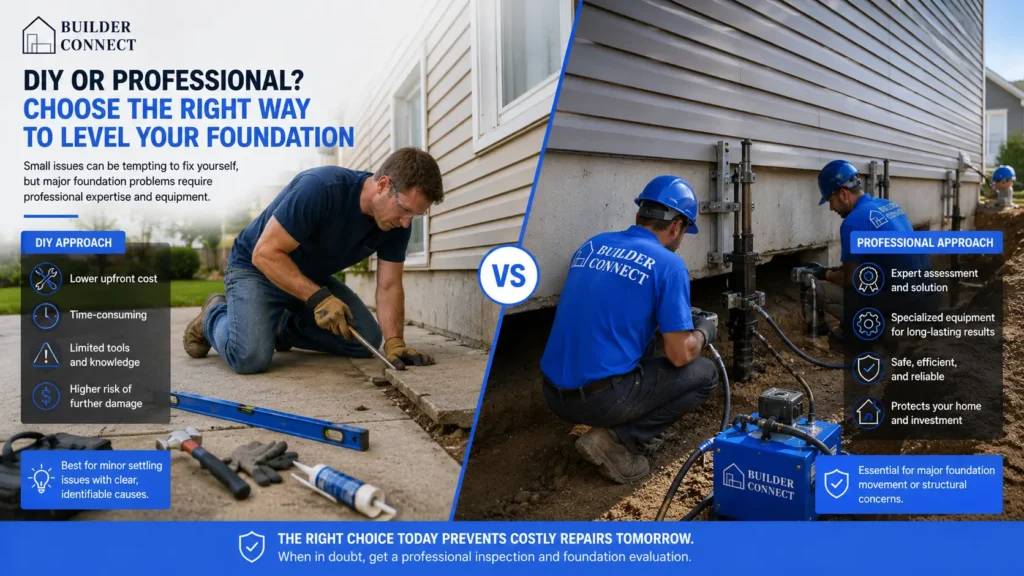
Can You Level A Concrete Foundation Yourself?
Leveling a concrete foundation can seem like a manageable project, especially with the availability of DIY tools and online tutorials. However, the reality is more nuanced. The feasibility of doing it yourself depends heavily on the extent of the damage, the type of foundation, and your level of experience. Understanding where DIY is appropriate and where professional intervention is necessary can help you avoid costly mistakes and ensure long-term stability.
When DIY Might Be Possible
In certain situations, leveling a concrete foundation can be handled without professional help, particularly when the issue is minor and localized. These scenarios typically involve surface-level corrections rather than structural repairs.
- Minor settling: Small, gradual shifts in a slab that do not affect structural integrity can often be corrected using self-leveling compounds or basic slab-jacking kits
- Small slabs: Areas like patios, sidewalks, garage floors, or small extensions are more manageable for DIY repairs because they are isolated from the main structural load
- Accessible areas: Foundations that are easy to reach and inspect allow for safer and more controlled repair work, reducing the risk of hidden complications
In these cases, a careful approach combined with proper tools and preparation can produce effective results. Still, it is important to confirm that the issue is cosmetic or minor before proceeding.
When You Should Hire A Professional
More serious foundation problems require specialized equipment, engineering knowledge, and experience that go beyond typical DIY capabilities. Attempting to fix these issues on your own can lead to further structural damage or safety hazards.
- Structural damage: Cracks that extend through walls, uneven load-bearing areas, or shifting support structures indicate deeper problems that need professional assessment
- Large homes: Foundations supporting larger or multi-story homes involve complex weight distribution, making precision critical during leveling
- Severe sinking: Significant foundation settlement often requires advanced solutions such as pier installation or deep-injection systems that cannot be safely replicated with DIY tools
Professionals not only address the visible symptoms but also identify and correct the underlying cause, which is essential for long-term stability.
Risks Of DIY Foundation Leveling
While DIY repairs may seem cost-effective upfront, they come with several risks that can outweigh the initial savings if not handled correctly. Understanding these risks is key to making an informed decision.
- Safety concerns: Working with heavy materials, lifting equipment, or drilling into concrete can lead to injury without proper training and safety precautions
- Worsening damage: Incorrect leveling techniques can create uneven pressure, leading to additional cracks or structural imbalance
- Cost of mistakes: Fixing a failed DIY repair often costs significantly more than hiring a professional from the start, especially if the damage spreads
In many cases, the biggest risk is not recognizing the true scope of the problem. What appears to be a simple uneven surface may actually be a sign of deeper soil or structural issues.
Taking the time to properly assess your foundation and understand your limits can save you from expensive repairs and long-term complications, making it easier to choose the right approach for your home.
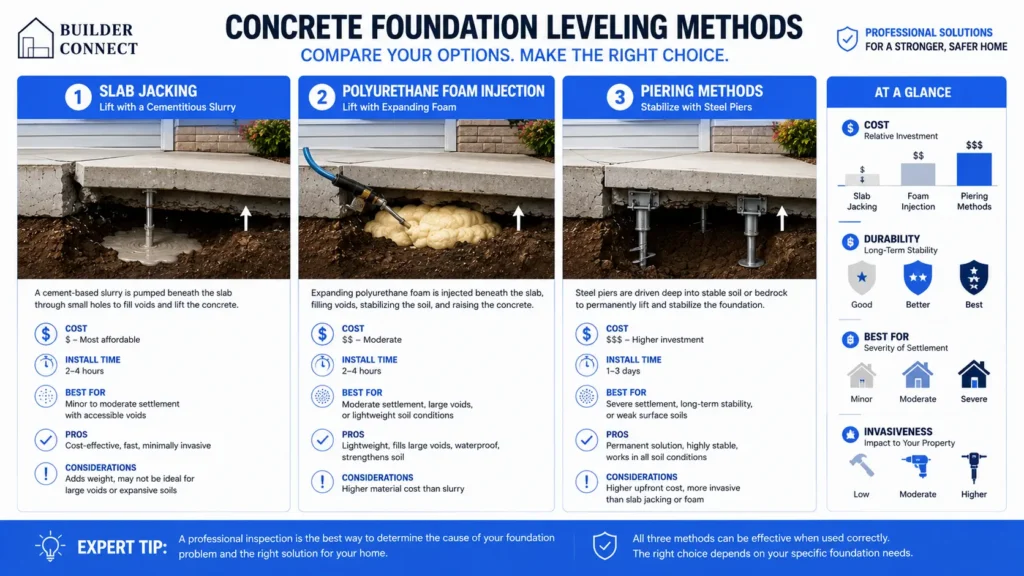
Common Methods For Leveling A Concrete Foundation
Leveling a concrete foundation is not a one-size-fits-all process. The right method depends on the severity of the settlement, soil conditions, and the structure itself. Understanding how each technique works and where it is most effective helps homeowners make informed decisions and avoid costly mistakes.
Slab Jacking (Mudjacking)
Slab jacking, also known as mudjacking, is one of the most traditional and widely used methods for lifting sunken concrete slabs. It is typically used for moderate settling where the foundation is still structurally sound.
How It Works
This process involves drilling small holes into the affected concrete slab and pumping a cement-based slurry underneath. The pressure from the injected material lifts the slab back to its original level.
- Injection process: A mixture of cement, sand, and water is pumped beneath the slab to fill voids and raise the surface
- Lift control: Technicians monitor the lift carefully to avoid over-correction or uneven results
- Surface repair: Once the slab is leveled, the drilled holes are sealed for a finished appearance
Pros And Cons
- Cost-effective solution: Generally more affordable than advanced methods, making it appealing for budget-conscious repairs
- Proven technique: Has been used for decades with reliable results in many residential applications
- Heavier material weight: The slurry adds weight to the soil, which can contribute to future settling in unstable ground
- Limited precision: Not ideal for highly sensitive or severely uneven foundations
Polyurethane Foam Injection
Polyurethane foam injection is a modern, high-performance alternative to mudjacking. It is known for its precision and minimal disruption during installation.
Modern Alternative
This method uses a lightweight, expanding foam that is injected beneath the slab. As the foam expands, it lifts the concrete and stabilizes the underlying soil.
- Expanding foam action: The foam reacts and expands quickly, filling voids and raising the slab with controlled pressure
- Minimal drilling: Smaller holes are required compared to mudjacking, resulting in less surface impact
- Fast curing time: The material hardens rapidly, allowing the area to be used almost immediately
Benefits Vs. Mudjacking
- Lightweight material: Reduces additional stress on already unstable soil conditions
- Greater precision: Allows for more controlled lifting, especially in delicate areas
- Long-term durability: Resistant to water and erosion, making it suitable for moisture-prone environments
- Higher cost: Typically more expensive upfront compared to traditional mudjacking methods
Piering (Push Piers or Helical Piers)
Piering is a structural repair method designed for serious foundation settlement. It is commonly used when the foundation has shifted significantly due to deep soil instability.
For Serious Foundation Settlement
This method involves driving steel piers deep into stable soil or bedrock beneath the foundation. The structure is then lifted and supported by these piers.
- Deep support system: Steel piers bypass unstable surface soil and anchor into load-bearing strata
- Hydraulic lifting: The home is gradually lifted back to level using controlled hydraulic systems
- Permanent stabilization: The foundation is secured to prevent further movement
Long-Term Stability
- Highly durable solution: Designed to provide long-lasting structural support for decades
- Effective for major issues: Ideal for homes experiencing significant sinking or shifting
- Professional installation required: Not suitable for DIY due to complexity and safety concerns
- Higher investment: One of the more expensive methods, but often necessary for severe damage
Self-Leveling Compounds (For Minor Repairs)
Self-leveling compounds are used for surface-level corrections rather than structural foundation repairs. They are best suited for small, localized uneven areas.
When Applicable
These compounds are poured over the existing surface and spread evenly to create a smooth, level finish.
- Interior use cases: Commonly used for leveling floors before installing tile, laminate, or hardwood
- Quick application: Easy to mix and apply with minimal tools
- Surface smoothing: Ideal for correcting dips, cracks, or minor imperfections
Limitations
- Not structural: Does not address underlying foundation issues or soil movement
- Limited depth correction: Only effective for small height differences
- Temporary fix: May require reapplication if the underlying problem persists
Choosing the right method comes down to understanding the severity of the problem and the long-term goals for your home. While minor issues can sometimes be addressed with simple solutions, more complex foundation problems require professional evaluation to ensure safe and lasting results.
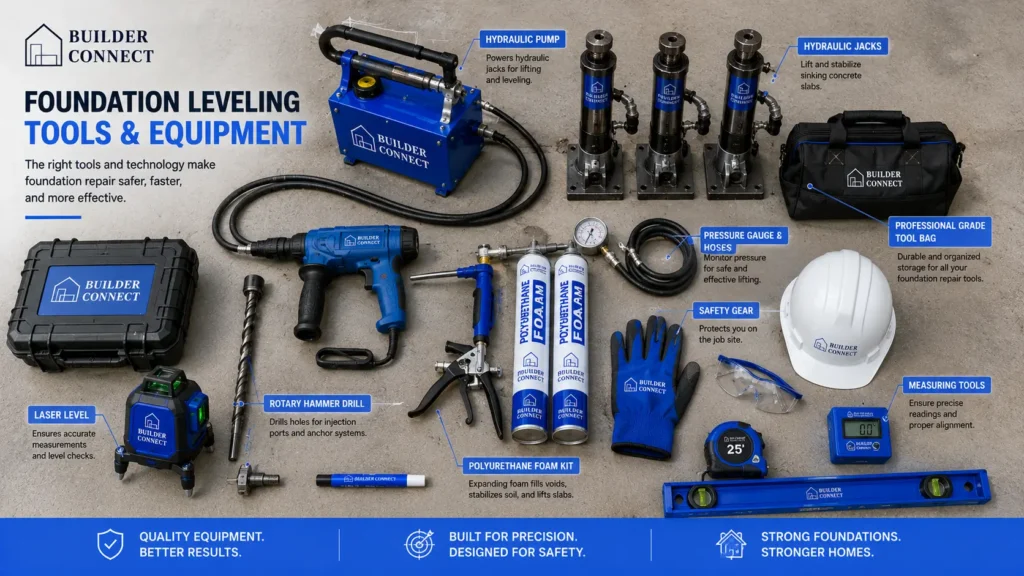
Tools And Materials You May Need
Before starting any foundation-leveling work, it is important to gather the right tools and materials to ensure accuracy, safety, and long-term results. Using proper equipment not only improves efficiency but also reduces the risk of uneven lifting, structural damage, or personal injury. The exact tools you need will depend on the leveling method you choose, but the items below are commonly used in both DIY and professional-grade foundation-repair projects.
Hydraulic Jacks
Hydraulic jacks are essential for lifting sections of a concrete foundation in a controlled and gradual manner. They are typically used in more hands-on leveling approaches where physical lifting is required.
- Load capacity: Choose a heavy-duty jack that can support the weight of your structure without strain
- Controlled lifting: Allows for slow, precise adjustments to prevent cracking or over-lifting
- Stability support: Often used alongside temporary supports or cribbing to hold the structure in place
Leveling Compound Or Foam Kits
Leveling materials are used to fill voids beneath the slab and raise it back to its original position. The choice between compound and foam depends on the severity of the issue and the method used.
- Self-leveling compound: Ideal for minor surface-level corrections and interior floors
- Polyurethane foam kits: Expand beneath the slab to lift and stabilize uneven areas
- Material selection: Foam is lightweight and water-resistant, while traditional compounds are more affordable for small repairs
Drill And Injection Ports
Drilling equipment is required for methods like slab jacking or foam injection, where material is pumped beneath the foundation.
- Precision drilling: Creates evenly spaced holes for consistent material distribution
- Injection ports: Allow controlled delivery of slurry or foam under pressure
- Hole placement: Proper spacing is critical to avoid uneven lifting or structural stress
Safety Gear (Gloves, Goggles)
Foundation work involves heavy materials, dust, and pressurized systems, making safety gear non-negotiable.
- Protective gloves: Shield hands from sharp edges, chemicals, and rough surfaces
- Safety goggles: Prevent debris or dust from entering the eyes during drilling and injection
- Basic protection: Reduces risk of injury during physically demanding tasks
Measuring Tools (Laser Level, Spirit Level)
Accurate measurements are key to ensuring the foundation is leveled evenly and correctly.
- Laser level: Provides precise, real-time measurements across larger areas
- Spirit level: Useful for quick checks and smaller sections
- Consistency checks: Helps verify that adjustments are even and prevents overcorrection
Having the right tools and materials is only part of the process, but it sets the foundation for a safe, efficient, and accurate leveling job that can protect your home for years to come.
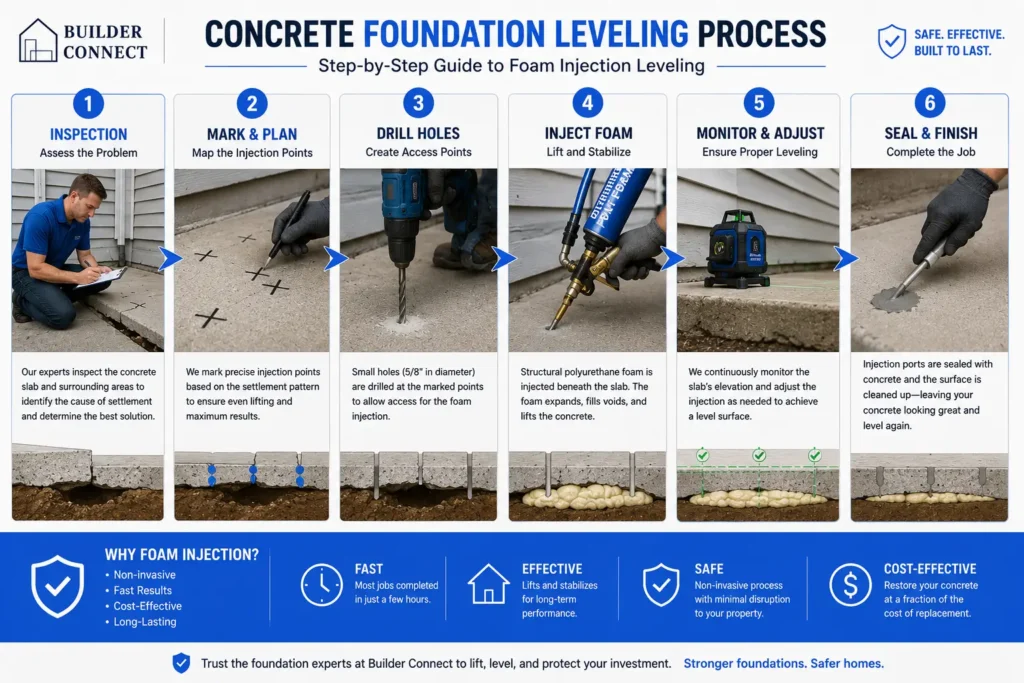
Step-by-Step: How To Level A Concrete Foundation
Leveling a concrete foundation is a precise, multi-step process that requires careful planning, the right tools, and a clear understanding of the underlying issue. Whether you are addressing minor settling or preparing for a more involved repair, following a structured approach helps ensure safe, long-lasting results while minimizing the risk of further structural damage.
Step 1: Inspect And Assess The Damage
Before any repair begins, you need a clear picture of what is happening beneath and around your foundation. Skipping this step often leads to short-term fixes that fail over time.
Start by measuring uneven areas throughout the home using a reliable level tool. A laser level or long spirit level can help you identify how much the slab has shifted and where the lowest points are located. Pay close attention to floors, corners, and transitions between rooms, as these areas often reveal the most movement.
Next, identify the root cause of the problem. Foundation movement is rarely random, and understanding the cause determines the correct solution.
- Soil movement: Expanding or contracting soil can push sections of the slab up or allow them to sink.
- Water issues: Poor drainage or leaks can soften soil and lead to uneven settling.
- Structural load stress: Heavier parts of the home may settle faster if the base was not evenly compacted.
A thorough inspection ensures you are not just leveling the surface, but addressing the underlying issue that caused the imbalance.
Step 2: Prepare The Area
Proper preparation makes the leveling process safer, cleaner, and more effective. This step also prevents contamination or interference during material injection.
Begin by clearing the work area. Remove furniture, floor coverings, or obstacles that may block access to the affected section. For exterior slabs or exposed foundations, clear away dirt, plants, and loose debris.
Once the area is accessible, mark the injection points. These are the locations where leveling material will be introduced beneath the slab.
- Strategic placement: Points should target the lowest areas first to ensure controlled lifting.
- Even spacing: Proper spacing helps distribute the material evenly under the foundation.
- Accessibility: Ensure each marked point can be drilled and reached safely.
Accurate preparation improves precision and reduces the likelihood of uneven lifting.
Step 3: Drill Holes For Injection (If Applicable)
For methods like slab jacking or foam injection, small holes must be drilled into the concrete to allow material to be injected beneath the surface.
Drill holes at the marked injection points using a masonry drill bit. The size and depth of the holes depend on the method being used, but consistency is key.
- Proper spacing: Holes are typically spaced evenly to ensure uniform material distribution.
- Controlled depth: Drilling too deep can weaken the slab, while shallow holes may limit effectiveness.
- Clean openings: Remove dust and debris from each hole to allow smooth material flow.
This step creates access points that allow you to stabilize and lift the slab from below rather than forcing movement from above.
Step 4: Inject Leveling Material
This is the core of the leveling process, where the foundation is gradually lifted back into position using injected material.
Depending on the method, you will use either a mudjacking slurry or a polyurethane foam. Both materials are designed to fill voids and provide upward pressure beneath the slab.
- Mudjacking slurry: A cement-based mixture that fills gaps and adds weight for support.
- Polyurethane foam: A lightweight, expanding material that lifts quickly and cures fast.
Inject the material slowly and monitor the movement in real time. Controlled injection is critical to avoid sudden or uneven lifting.
- Gradual lifting: Raise the slab in small increments to prevent cracking or stress.
- Even distribution: Move between injection points to maintain balance.
- Continuous monitoring: Watch the surface closely to track elevation changes.
Patience during this step ensures a stable and even result.
Step 5: Check Level And Make Adjustments
After the initial lift, you must verify that the foundation has returned to an even position. This step ensures accuracy and prevents overcorrection.
Use a level tool to check all previously affected areas. Compare measurements with your initial assessment to confirm improvement.
- Precision checks: Re-measure low points to confirm alignment.
- Fine adjustments: Add small amounts of material where needed to correct minor dips.
- Avoid overcorrection: Lifting too much can create new stress points or cracks.
Take your time during this phase, as small adjustments can make a significant difference in overall stability.
Step 6: Seal Holes And Clean Up
Once the foundation is level, the final step is to restore the surface and ensure everything is secure and visually consistent.
Seal each drilled hole using a concrete patching compound. Smooth the surface so it blends with the surrounding slab.
- Durable patching: Use a high-quality compound to prevent future wear.
- Surface finishing: Ensure patches are level with the surrounding area.
- Final inspection: Double-check the entire foundation for consistency and stability.
Cleaning up the area and completing a final inspection ensures the repair is both structurally sound and visually complete.
Leveling a concrete foundation is a detail-focused process that requires careful assessment, controlled execution, and attention to underlying causes, so taking the time to follow each step properly can make the difference between a temporary fix and a long-lasting solution.
Cost Of Leveling A Concrete Foundation
Understanding the cost of leveling a concrete foundation is essential before starting any repair work. Pricing can vary widely depending on the severity of the issue, the repair method used, and the condition of your home. Whether you are considering a DIY approach or hiring a professional, having a clear cost breakdown helps you make a confident, well-informed decision.
DIY Cost Estimates
For minor foundation issues, a DIY approach can be a cost-effective option, especially if the problem is limited to small, non-structural areas like uneven slabs or minor settling. However, it is important to understand both the upfront costs and the potential risks.
- Basic Materials: Self-leveling compounds, patching materials, or foam kits typically range from $50 to $500 depending on the size of the repair area
- Tool Rental: Equipment such as drills, mixers, or small hydraulic jacks may cost $50 to $200 per day if not already owned
- Safety Gear: Gloves, goggles, and protective clothing may add an additional $20 to $100
- Total Estimated Range: Most DIY foundation leveling projects fall between $100 and $1,000 for minor repairs
While these costs are relatively low, DIY work is best suited for surface-level fixes. Attempting to correct deeper structural problems without proper expertise can lead to uneven lifting, further cracking, or long-term instability.
Professional Service Costs
For moderate to severe foundation problems, hiring a professional is usually the safest and most effective solution. Professional contractors use specialized equipment and proven techniques to ensure accurate leveling and long-term durability.
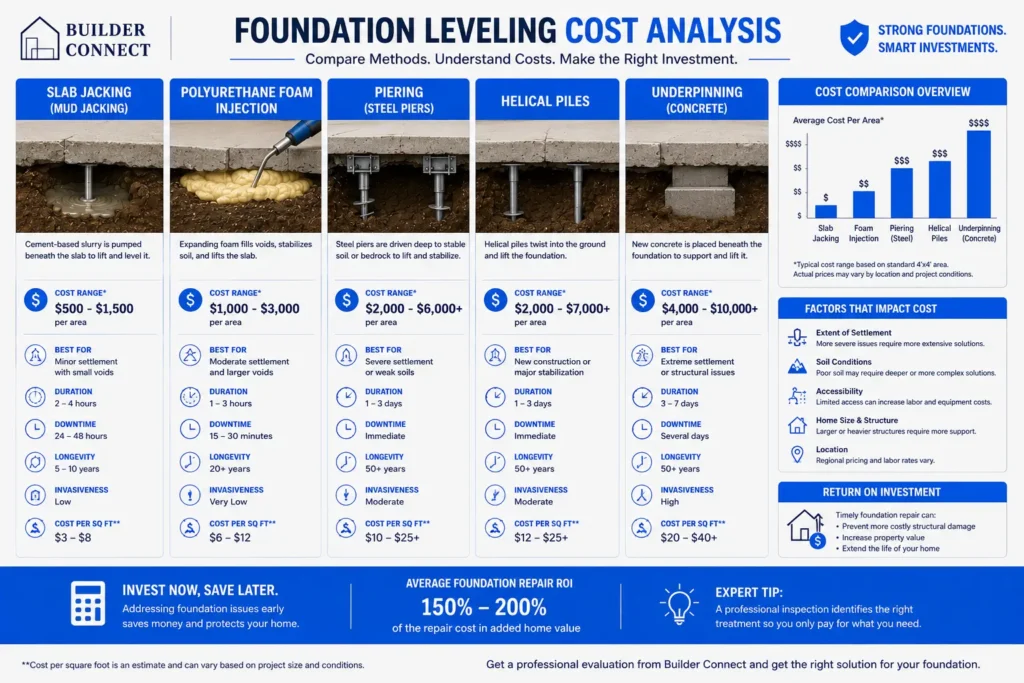
- Slab Jacking Or Mudjacking: Typically costs between $500 and $1,500 for small to medium areas, depending on the amount of material required
- Polyurethane Foam Injection: Usually ranges from $1,000 to $3,000 and is considered a more precise and long-lasting solution
- Piering Systems: Push piers or helical piers can cost between $3,000 and $10,000 or more, especially for large homes with significant settlement
- Inspection Fees: Some contractors charge $100 to $300 for a detailed structural assessment, though this may be credited toward the repair
Professional services often include warranties, engineering assessments, and long-term support, which can add significant value and peace of mind compared to DIY fixes.
Factors That Affect Pricing
Several key factors influence the final cost of leveling a concrete foundation. Understanding these variables helps explain why estimates can differ so much from one project to another.
- Severity Of Damage: Minor settling is far less expensive to fix than major structural shifts that require deep support systems
- Repair Method Used: Simple leveling techniques cost less than advanced solutions like pier installation or full structural reinforcement
- Location Of The Home: Labor rates, soil conditions, and local regulations can impact pricing in different regions
- Accessibility Of The Area: Hard-to-reach areas, tight crawl spaces, or landscaping obstacles can increase labor time and overall cost
Each home presents a unique situation, so accurate pricing often requires an on-site inspection. A detailed assessment ensures that the chosen repair method addresses the root cause rather than just the visible symptoms.
In the end, the right investment depends on the extent of the problem and your long-term goals, but addressing foundation issues early is almost always more affordable than delaying repairs and dealing with larger structural damage later.
How Long Does Foundation Leveling Last?
Foundation leveling is not a one-size-fits-all fix, and its longevity depends on the method used, the condition of the soil, and how well underlying issues are addressed. A properly executed repair can last for decades, but long-term performance always comes down to whether the root cause of the problem was solved, not just the visible symptoms.
Longevity By Method
Different leveling techniques offer varying levels of durability, and understanding these differences helps set realistic expectations.
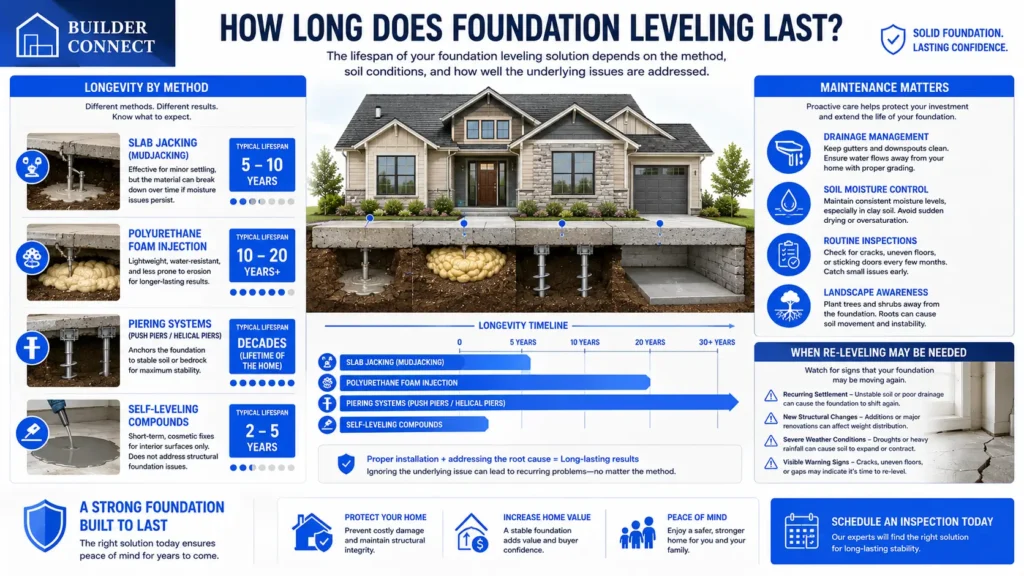
- Slab Jacking (Mudjacking): This method typically lasts 5 to 10 years, depending on soil stability and drainage conditions. It is effective for minor settling, but the material used can break down over time if moisture issues persist.
- Polyurethane Foam Injection: Foam-based leveling can last 10 to 20 years or more because the material is lightweight, water-resistant, and less prone to erosion. It is often considered a longer-lasting solution for moderate foundation issues.
- Piering Systems (Push Piers or Helical Piers): These are the most durable solutions, often lasting several decades or even the lifetime of the home. By anchoring the foundation to stable soil layers, they provide long-term structural support.
- Self-Leveling Compounds: These are short-term fixes used mainly for interior surfaces and cosmetic leveling. They may last several years but do not address structural foundation problems.
Maintenance Considerations
Even the best repair method can fail early if proper maintenance is ignored. Ongoing care plays a major role in preserving the stability of your foundation.
- Drainage Management: Ensure water flows away from your home with properly installed gutters, downspouts, and grading. Poor drainage is one of the leading causes of foundation movement.
- Soil Moisture Control: Keep soil moisture consistent around the foundation, especially in areas with expansive clay soil. Sudden drying or saturation can lead to shifting.
- Routine Inspections: Check for new cracks, uneven floors, or sticking doors every few months. Early detection allows for minor corrections before major repairs are needed.
- Landscape Awareness: Avoid planting large trees too close to the foundation, as roots can draw moisture unevenly from the soil and cause movement.
When Re-Leveling May Be Needed
Even after a successful repair, certain conditions may require additional leveling in the future. Knowing what to watch for can help you act quickly.
- Recurring Settlement: If the original issue, such as unstable soil or poor drainage, was not fully resolved, the foundation may begin to shift again over time.
- New Structural Changes: Home additions or major renovations can alter weight distribution, potentially causing new areas of settling.
- Severe Weather Conditions: Extended droughts or heavy rainfall can significantly impact soil behavior, leading to renewed foundation movement.
- Visible Warning Signs: Reappearance of cracks, uneven floors, or gaps between walls and ceilings may indicate that re-leveling is necessary.
A well-leveled foundation can provide long-lasting stability, but its true lifespan depends on proper method selection, environmental conditions, and consistent maintenance. By addressing the root cause and staying proactive, homeowners can extend the life of their repairs and avoid repeated issues.
How To Prevent Future Foundation Problems
Preventing foundation issues is far more cost-effective than repairing them after damage occurs. Most concrete foundation problems develop gradually due to environmental conditions, water management, and soil behavior. By taking a proactive, maintenance-focused approach, homeowners can significantly reduce the risk of uneven settling and extend the life of their foundation.
Improve Drainage Around Your Home
Poor drainage is one of the most common causes of foundation movement. When water collects around the base of your home, it can weaken the soil and lead to shifting or erosion.
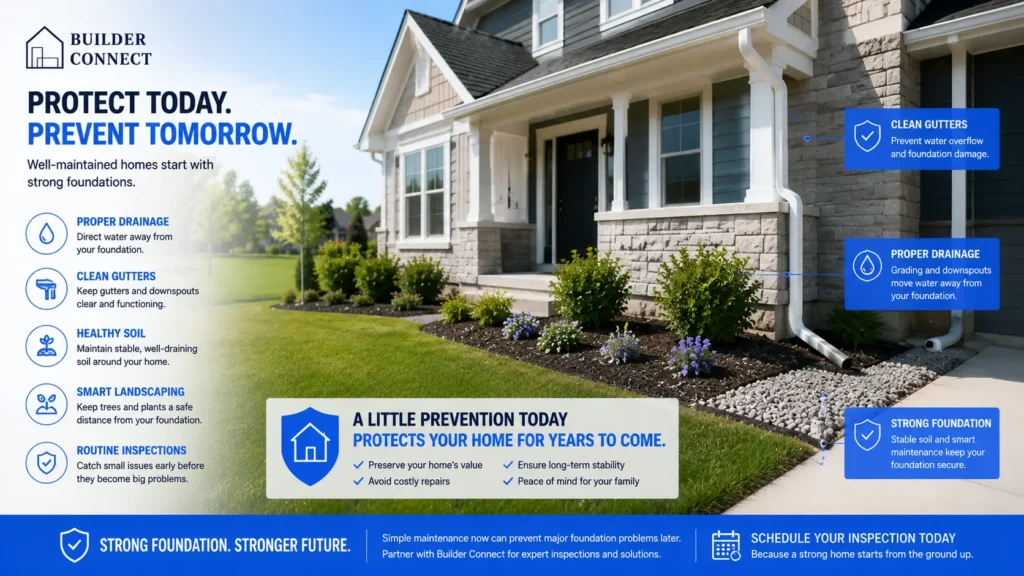
- Grade your landscape properly: Ensure the ground slopes away from your home by at least a few inches over several feet to prevent water pooling near the foundation.
- Install a French drain system: A well-installed drainage system redirects excess water away from the foundation, especially in areas prone to heavy rainfall.
- Avoid water accumulation near walls: Keep flower beds, mulch, and landscaping materials from trapping moisture against the foundation.
- Monitor after heavy rain: Check for standing water or slow drainage areas and address them quickly before they cause long-term damage.
Maintain Consistent Soil Moisture
Soil expansion and contraction due to moisture fluctuations can cause significant foundation movement, especially in clay-heavy soil conditions.
- Water during dry periods: Lightly watering the soil around your home during extended dry spells helps prevent shrinkage that leads to settling.
- Avoid overwatering: Excessive moisture can soften the soil and create instability, so balance is key.
- Use soaker hoses strategically: Placing hoses around the perimeter allows for controlled, even moisture distribution.
- Watch for seasonal changes: Pay attention to how your soil behaves during wet and dry seasons and adjust your maintenance routine accordingly.
Install Proper Gutters And Downspouts
A well-functioning gutter system plays a critical role in directing water away from your foundation.
- Keep gutters clean: Regularly remove leaves and debris to ensure water flows freely through the system.
- Extend downspouts away from the home: Downspouts should discharge water at least several feet from the foundation to prevent saturation.
- Check for leaks or damage: Cracks or loose connections can allow water to spill near the base of your home.
- Consider gutter guards: These can reduce maintenance and help prevent clogs that lead to overflow issues.
Schedule Regular Inspections
Routine inspections help catch small problems before they turn into costly repairs. Even minor shifts can signal early-stage foundation issues.
- Perform visual checks: Look for cracks, uneven flooring, or gaps inside and outside your home.
- Track changes over time: Mark and monitor cracks to see if they are growing or stabilizing.
- Hire a professional when needed: A foundation specialist can identify hidden issues and recommend preventive solutions.
- Inspect after extreme weather: Heavy rain, drought, or flooding can accelerate foundation movement, making post-event checks essential.
Taking a consistent, preventative approach helps protect your foundation from common risks and ensures your home remains structurally sound for years to come.
Common Mistakes To Avoid When Leveling A Foundation
Leveling a concrete foundation requires precision, planning, and a clear understanding of the underlying issue. Many homeowners focus only on fixing the visible problem without addressing the cause, which can lead to recurring damage or even more expensive repairs. Avoiding the following common mistakes can help ensure a safer, longer-lasting result.
Overlifting The Slab
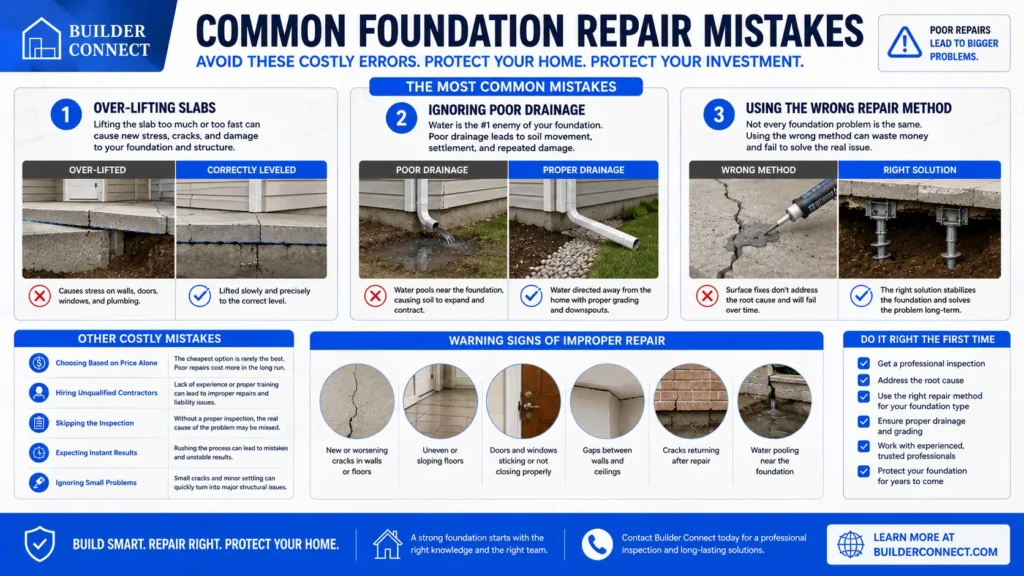
One of the most frequent mistakes in foundation leveling is lifting the slab too quickly or too high. While it may seem logical to restore the foundation to its original position immediately, this approach can create new structural stress.
- Structural imbalance: Rapid or excessive lifting can shift weight unevenly across the foundation, leading to cracks in walls, ceilings, or flooring
- Material strain: Older concrete and framing materials may not tolerate sudden movement, increasing the risk of breakage
- Precision issues: Controlled, gradual lifting allows for better monitoring and adjustment, ensuring the foundation is leveled correctly
Experienced professionals typically raise a slab in small increments, checking alignment at each stage to avoid overcorrection.
Ignoring Root Causes
Fixing the surface issue without addressing why the foundation became uneven is a short-term solution that often leads to repeat problems. Foundation movement is usually a symptom of deeper issues.
- Soil instability: Expansive or poorly compacted soil can continue to shift if not stabilized
- Water-related problems: Poor drainage, leaking pipes, or improper grading can erode or soften the soil beneath the foundation
- Environmental factors: Tree roots or seasonal moisture changes can disrupt the soil structure over time
A long-term repair strategy should always include correcting these underlying conditions, not just leveling the slab.
Using The Wrong Method
Not all foundation issues require the same solution, and choosing the wrong method can result in ineffective or temporary fixes. Each technique is designed for specific conditions and levels of damage.
- Mismatch of method and severity: Self-leveling compounds may work for minor surface issues but are ineffective for structural settlement
- Improper material selection: Using low-quality or unsuitable materials can reduce durability and performance
- Lack of site-specific assessment: Soil type, climate, and foundation design all influence the appropriate repair approach
Selecting the correct method often requires a careful evaluation of the foundation’s condition, which is why professional input can be valuable even for experienced DIYers.
Skipping Professional Inspection When Needed
While some minor repairs can be handled independently, more complex foundation problems should not be approached without expert guidance. Skipping a professional inspection can lead to misdiagnosis and costly mistakes.
- Hidden structural damage: Issues beneath the surface may not be visible without specialized tools or experience
- Safety risks: Incorrect repairs can compromise the structural integrity of the home
- Long-term costs: A professional assessment may prevent repeated repairs and higher expenses in the future
Even if you plan to handle the repair yourself, getting a professional evaluation can provide clarity and help you choose the safest, most effective solution.
Addressing foundation issues the right way means taking a careful, informed approach rather than rushing into repairs. By avoiding these common mistakes, you improve both the durability of the fix and the overall stability of your home.
References
- Concrete Foundation Leveling: Everything You Need to Know
https://www.architecturecourses.org/home-and-garden/concrete-foundation-leveling (Architecture Courses) - Concrete Foundation Leveling: Methods & Causes
https://engineerfix.com/concrete-foundation-leveling-methods-causes (Engineer Fix) - How Concrete Leveling Works (Methods & Costs)
https://www.a1concrete.com/concrete-repair-learning-center/how-concrete-leveling-works (A1 Concrete) - Foundation Leveling Explained for Homeowners
https://www.jeswork.com/resources/foundation-repair/foundation-leveling-explained (JES Foundation Repair) - How to Level a Foundation (Methods and Process Guide)
https://constructli.com/how-to-level-a-foundation (constructli.com)
FAQs: About How To Level A House Concrete Foundation
Conclusion
Addressing foundation problems early is one of the most important steps you can take to protect your home’s structural integrity and long-term value. What may start as small cracks or slight unevenness can quickly turn into costly repairs if left untreated, affecting everything from flooring to walls and even plumbing systems. Investing in proper foundation leveling not only improves safety but also prevents more extensive damage down the line, saving you significant time, stress, and money. Whether you choose a DIY-friendly approach for minor issues or hire a qualified professional for more complex repairs, the key is making an informed decision based on the severity of the problem and your level of experience.
Find A Professional Concrete Company Near You!
- Asphalt Carpark Construction Wairarapa
- Asphalt Contractors Auckland
- Asphalt Contractors Christchurch
- Asphalt Contractors Hamilton
- Asphalt Contractors Hawkes Bay
- Asphalt Contractors Waikato
- Asphalt Dannevirke
- Asphalt Driveways Tauranga
- Christchurch Concrete Services
- Concrete Contractors Nelson
- Concrete Contractors Tauranga
- Concrete Coromandel, Waihi, and Paeroa
- Concrete Dannevirke
- Concrete Driveways Lower Hutt
- Concrete Driveways Upper Hutt
- Concrete Floor Slabs Kapiti Coast
- Concrete Foundations Kapiti
- Concrete Layers Auckland
- Concrete Layers Cambridge
- Concrete Layers Hamilton
- Concrete Layers Invercargill
- Concrete Layers Kapiti
- Concrete Layers Levin
- Concrete Layers Lower Hutt
- Concrete Layers North Shore
- Concrete Layers Northland
- Concrete Layers Pukekohe
- Concrete Layers Rodney
- Concrete Layers Te Awamutu
- Concrete Layers Upper Hutt
- Concrete Layers Waikato
- Concrete Layers Wellington
- Concrete Manuwatu
- Concrete Masterton
- Concrete Palmerston North
- Concrete Services Rotorua
- Concrete Whangarei
- Hastings Concrete Company
- Hawkes Bay Concrete Company
- Napier Concrete Company
About the Author:
Mike Veail is a recognized digital marketing expert with over 6 years of experience in helping tradespeople and small businesses thrive online. A former quantity surveyor, Mike combines deep industry knowledge with hands-on expertise in SEO and Google Ads. His marketing strategies are tailored to the specific needs of the trades sector, helping businesses increase visibility and generate more leads through proven, ethical methods.
Mike has successfully partnered with numerous companies, establishing a track record of delivering measurable results. His work has been featured across various platforms that showcase his expertise in lead generation and online marketing for the trades sector.
Learn more about Mike's experience and services at https://theleadguy.online or follow him on social media: