Welcome to your ultimate guide on how to stain a deck in New Zealand! Whether you’re looking to refresh the look of your outdoor space or protect your deck from the unique challenges of New Zealand’s climate, this comprehensive guide will walk you through everything you need to know. From understanding why staining is crucial, to preparing your deck, choosing the right stain, and applying it effectively, we’ve got you covered. Read on to ensure your deck not only looks stunning but also stands up to the elements, giving you a beautiful and durable outdoor area to enjoy for years to come. For professional help, contact experienced fencing contractors in your area.
To stain a deck in New Zealand, start by thoroughly cleaning the deck and making necessary repairs. Choose a high-quality stain suitable for NZ’s climate. Apply the stain evenly using a brush or roller, ensuring you cover all corners and edges. Allow the stain to dry completely before applying a second coat if needed. Regular maintenance and periodic re-staining will keep your deck looking great and protected from the elements.
Understanding The Importance Of Staining Your Deck
Why Staining Matters
Staining your deck is not just about enhancing its visual appeal, although that’s certainly a significant benefit. The primary reason for staining is to protect the wood from the elements. Unstained wood is vulnerable to moisture, which can lead to mold, mildew, and rot. These issues compromise the structural integrity of the deck, potentially leading to costly repairs or even the need for a complete replacement.
Staining also offers protection against the sun’s UV rays. Prolonged exposure to sunlight can cause wood to fade, dry out, and crack. By applying a stain, you create a barrier that helps to maintain the wood’s natural oils, keeping it looking vibrant and fresh. Moreover, staining prevents wood from warping and splitting, which can happen due to fluctuations in temperature and humidity.
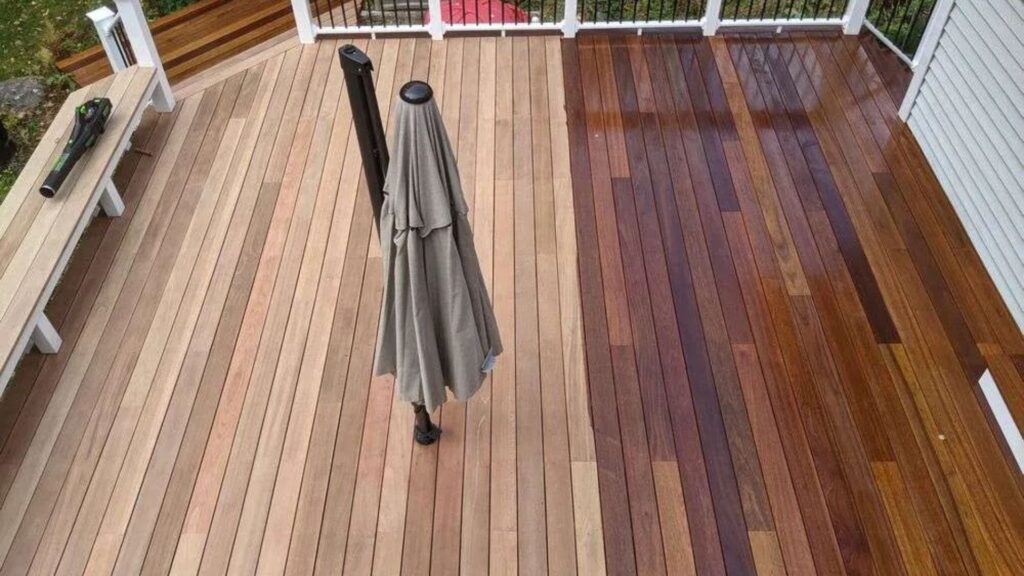
Another benefit is that stains can highlight the natural beauty of the wood grain, enhancing the overall aesthetic of your outdoor space. Whether you prefer a clear stain that showcases the wood’s natural color or a tinted stain that adds a touch of your favorite hue, the right stain can significantly improve the look of your deck.
Climate Considerations in NZ
New Zealand’s climate presents unique challenges for deck maintenance. The country experiences a range of weather conditions, from heavy rainfall to intense UV exposure, all of which can take a toll on your deck.
In regions with high rainfall, such as the West Coast, moisture can be a constant threat. Rainwater can seep into the wood, leading to swelling, warping, and the growth of mold and mildew. Staining provides a waterproof barrier that helps to repel water, keeping your deck dry and structurally sound.
On the other hand, areas that receive a lot of sunshine, like the North Island, have to contend with UV damage. The sun’s rays can break down the wood fibers, causing them to deteriorate over time. A good quality stain contains UV inhibitors that protect the wood from the harmful effects of the sun, ensuring your deck remains strong and looking great for longer.
In coastal areas, the salty air can also affect the wood, leading to accelerated wear and tear. Regular staining helps to shield the wood from salt corrosion, extending the lifespan of your deck.
By understanding the importance of staining and considering New Zealand’s diverse climate conditions, you can take the necessary steps to protect and maintain your deck. Regular staining not only preserves the wood’s beauty but also ensures its durability, making your outdoor space a more enjoyable place to be.
Preparing Your Deck For Staining
Safety First
When preparing your deck for staining, the first priority should always be safety. Ensuring you have the right protective gear is essential. Equip yourself with durable gloves to protect your hands from harsh chemicals and rough surfaces. A mask is crucial to avoid inhaling dust and fumes from cleaners and stains. Protective clothing, such as long sleeves and pants, will shield your skin from splashes and splinters. Safety goggles are also recommended to protect your eyes from debris and chemicals. Taking these precautions will help you work safely and efficiently, ensuring a smooth staining process.
Cleaning the Deck
Properly cleaning your deck is a critical step in preparing it for staining. A clean surface allows the stain to adhere better, resulting in a more even and lasting finish.
Materials Needed
- Deck cleaner or a mixture of water and mild detergent
- Stiff-bristle brush or deck brush
- Pressure washer (optional, but highly effective)
- Hose with a spray nozzle
- Bucket
- Safety gear (gloves, mask, goggles)
Cleaning Process
1. Remove Debris: Start by clearing the deck of any furniture, plants, and decorations. Sweep away leaves, dirt, and other debris using a broom or leaf blower.
2. Pre-Rinse the Deck: Use a hose to rinse off the deck, removing loose dirt and grime. This initial rinse helps to loosen any stubborn dirt before applying the cleaner.
3. Apply the Deck Cleaner: Mix the deck cleaner according to the manufacturer’s instructions. If using a homemade solution, combine water and mild detergent in a bucket. Apply the cleaner to the deck using a stiff-bristle brush or deck brush, scrubbing in the direction of the wood grain.
4. Scrub the Deck: Pay special attention to areas with heavy stains or mildew. Use the brush to scrub these spots thoroughly. For deep cleaning, consider using a pressure washer on a low setting. Be cautious not to damage the wood with high pressure.
5. Rinse Thoroughly: Once you’ve scrubbed the entire deck, rinse it thoroughly with a hose. Ensure all the cleaner and loosened dirt are washed away. A pressure washer can also be used for this step to ensure a clean finish.
6. Allow the Deck to Dry: Let the deck dry completely. This may take 24 to 48 hours depending on the weather conditions. A dry deck is crucial for the stain to penetrate the wood properly.
Repairing the Deck
Inspecting your deck for damage and making necessary repairs is essential before applying any stain. This ensures the deck is in good condition and the stain application is effective.
1. Inspect for Damage: Look for loose or protruding nails, screws, or boards. Check for signs of rot, mold, or mildew. Also, inspect the deck for any cracks, splinters, or other damage.
2. Tighten and Replace Fasteners: Use a hammer or screwdriver to secure any loose nails or screws. Replace any fasteners that are damaged or rusted to ensure the deck’s structural integrity.
3. Repair or Replace Damaged Boards: If you find any boards that are cracked, warped, or rotting, replace them. Sand down any splintered areas to create a smooth surface.
4. Fill Cracks and Holes: Use wood filler or putty to fill in any cracks, holes, or gaps. Allow the filler to dry according to the manufacturer’s instructions, then sand the area smooth.
By following these steps, you’ll ensure your deck is clean, safe, and in optimal condition for staining. Proper preparation not only enhances the appearance of your deck but also extends its lifespan, providing you with a beautiful and durable outdoor space.
Choosing The Right Stain For Your Deck
Selecting the right stain for your deck is crucial in ensuring its longevity and aesthetic appeal. Here’s a detailed look at the different types of stains available, their advantages and disadvantages, the best options for New Zealand’s unique climate, and how to pick the perfect colour to enhance your outdoor space.
Types of Stains
When it comes to deck stains, there are three primary types to consider: transparent, semi-transparent, and solid stains. Each type has its own set of benefits and potential drawbacks.
1. Transparent Stains
- Pros: Transparent stains allow the natural beauty of the wood grain to shine through, providing a more natural look. They offer basic protection against UV rays and moisture.
- Cons: They generally require more frequent reapplication compared to other types of stains, as their protection level is minimal.
2. Semi-Transparent Stains
- Pros: Semi-transparent stains strike a balance between showing off the wood grain and providing a hint of colour. They offer better protection against the elements than transparent stains and are available in a variety of colours.
- Cons: While they offer more protection, they might slightly obscure the natural grain of the wood. Regular maintenance is still required to keep the deck looking its best.
3. Solid Stains
- Pros: Solid stains provide the highest level of protection against UV rays, moisture, and foot traffic. They come in a wide range of colours and can completely cover the wood grain, giving your deck a uniform appearance.
- Cons: Because they cover the wood grain, they can make your deck look more like it’s been painted rather than stained. Solid stains may also require more preparation before reapplication, such as sanding or stripping.
Best Stains for NZ Conditions
New Zealand’s climate can be quite harsh on outdoor wood structures, with high levels of UV radiation, varying humidity, and frequent rainfall. Therefore, choosing a stain that can withstand these conditions is essential.
- UV-Resistant Stains: Products that are specifically formulated to protect against UV rays are crucial in New Zealand. Look for stains with UV blockers or UV inhibitors to prevent the wood from fading and becoming damaged.
- Moisture-Resistant Stains: Given the high humidity and rainfall, opting for a stain that offers excellent moisture protection will help prevent issues like mould, mildew, and wood rot.
- Durable and Long-Lasting: Stains that are known for their durability and longevity, such as those with a high acrylic content, are ideal. They tend to provide better adhesion and withstand wear and tear better than other types.
Colour Selection
Choosing the right colour for your deck stain is just as important as selecting the type and quality. Here are some tips to help you pick a stain colour that complements your home and outdoor environment.
- Consider Your Home’s Exterior: The colour of your deck stain should harmonize with the colour of your home’s exterior. If your home has a warm colour palette, consider stains in similar warm tones like reds, browns, or golds. For homes with cooler tones, shades of grey, blue, or green can work well.
- Think About the Environment: Look at the natural surroundings of your deck. If you have a lot of greenery, earthy tones like browns and greens can blend seamlessly with the landscape. For coastal homes, lighter colours like sandy beiges or weathered greys can create a cohesive look.
- Test Before You Commit: Always test a small, inconspicuous area of your deck with the stain before fully committing. This allows you to see how the colour looks in different lighting and ensures you’re happy with the final result.
- Future Maintenance: Remember that lighter colours may show dirt and stains more easily than darker colours. Consider your willingness to clean and maintain the deck when choosing your stain colour.
By carefully selecting the type, quality, and colour of your deck stain, you can ensure that your deck not only looks fantastic but also withstands the unique challenges posed by New Zealand’s climate. Whether you prefer a natural, semi-transparent look or a bold, solid finish, there is a perfect stain out there for your needs.
How To Stain Your Deck
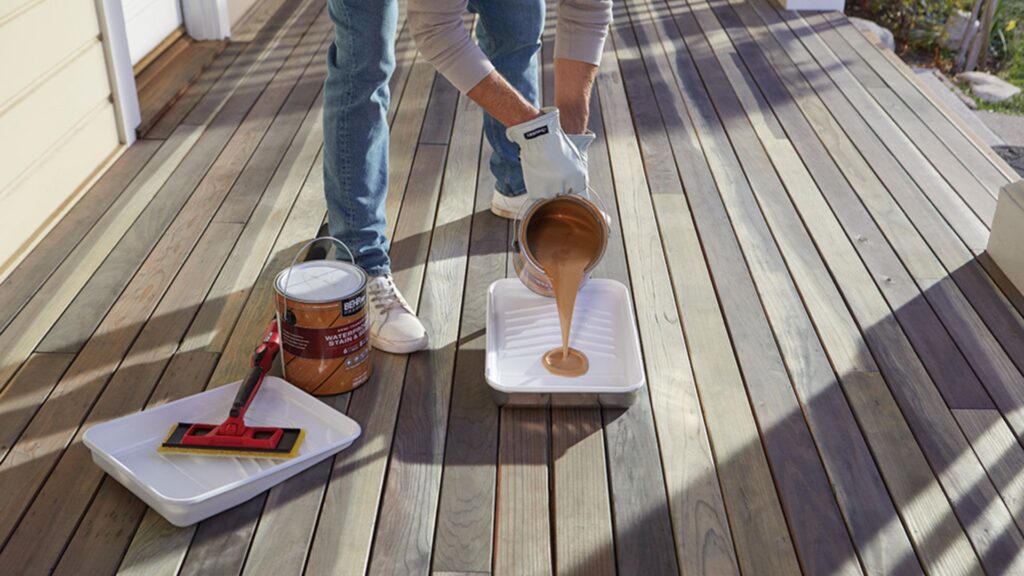
Gathering Supplies
Before diving into the staining process, it’s crucial to gather all the necessary supplies. This ensures you have everything at hand, making the job smoother and more efficient. Here’s a list of essential materials and tools you’ll need.
- Stain: Choose a high-quality deck stain suited for your type of wood and the look you want to achieve. Options include transparent, semi-transparent, and solid stains.
- Brushes: Use natural bristle brushes for oil-based stains and synthetic bristle brushes for water-based stains. Brushes are excellent for detailed work and edges.
- Rollers: Select a roller with a nap appropriate for the texture of your deck. Rollers cover large areas quickly but may not reach into grooves as effectively as brushes.
- Painter’s Tape: Use this to protect areas you don’t want to stain, such as the siding of your house or any metal fixtures.
- Drop Cloths: These protect your surroundings from accidental drips and spills. Lay them around the deck to keep the area clean.
- Stir Stick: Ensure the stain is well-mixed before application for consistent color and finish.
- Sandpaper or Sanding Block: Lightly sand the deck to remove any rough spots or old finish, allowing the stain to adhere better.
- Clean Rags: Useful for wiping up excess stain and for any necessary touch-ups.
Weather Check
Selecting the right weather conditions is pivotal for a successful deck staining project. Staining your deck in optimal weather ensures the stain adheres properly and dries evenly. Here are some tips on choosing the best weather.
- Dry Conditions: Stain needs a dry surface to adhere properly. Make sure there’s no rain forecast for at least 48 hours after application.
- Mild Temperatures: The ideal temperature range for staining is between 50°F and 90°F (10°C to 32°C). Too hot, and the stain may dry too quickly, causing unevenness. Too cold, and it may not penetrate the wood effectively.
- Avoid Windy Days: Wind can blow debris onto your freshly stained deck and cause uneven drying.
Staining Process
Staining your deck involves several steps, each crucial for achieving a professional-looking finish. Follow this detailed guide to ensure a flawless application.
1. Preparation
Clean the deck thoroughly to remove dirt, grime, and old finish. Use a deck cleaner or a mixture of water and mild detergent. Allow the deck to dry completely.
2. Sanding
Lightly sand the deck to smooth out any rough spots and ensure the wood is ready to absorb the stain. Wipe away the dust with a clean rag.
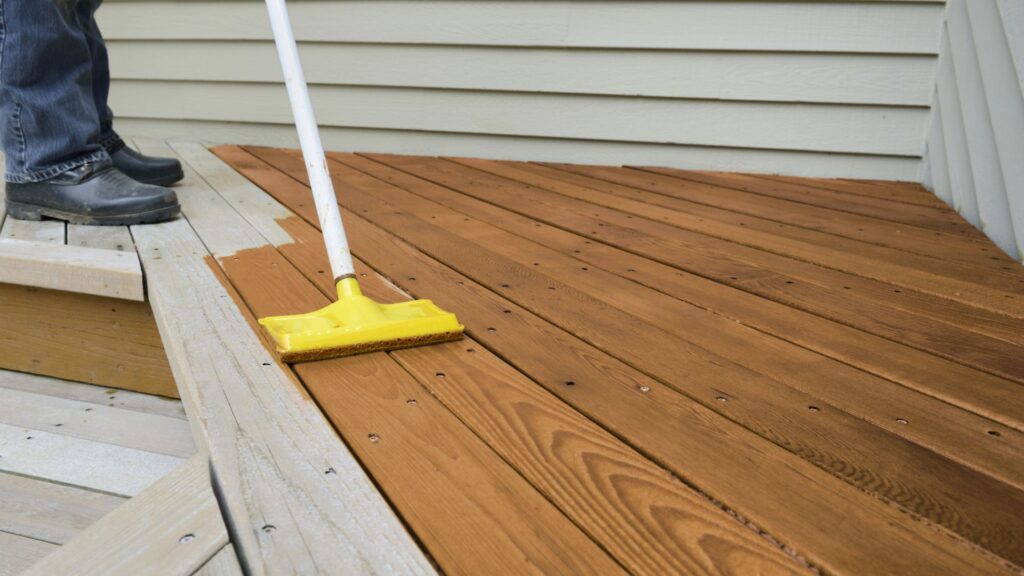
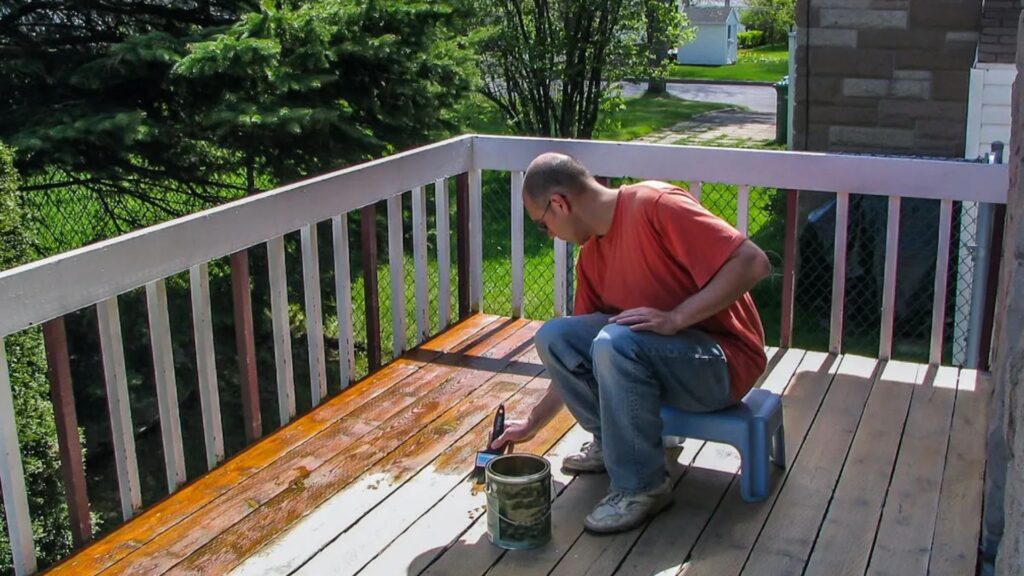
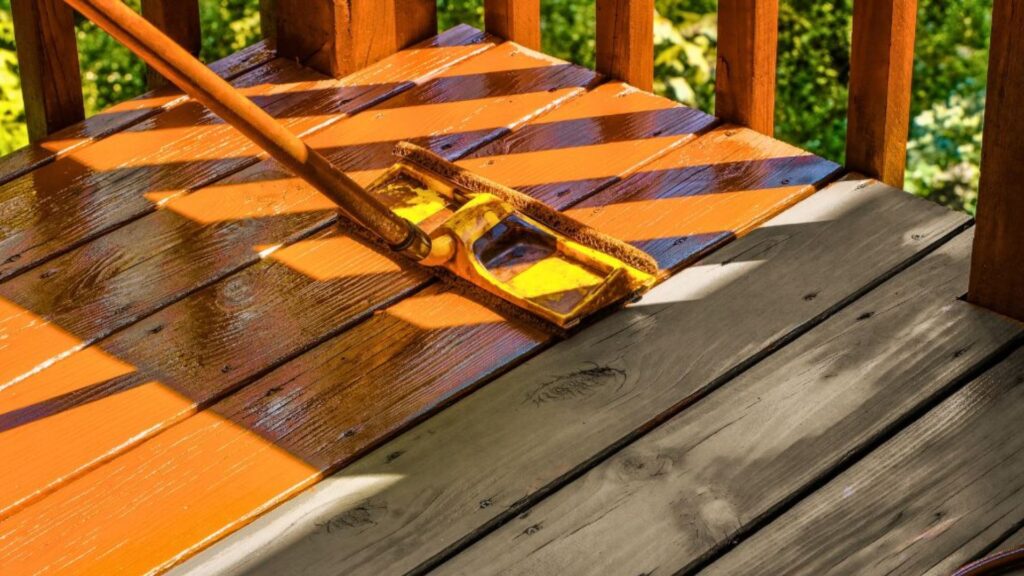
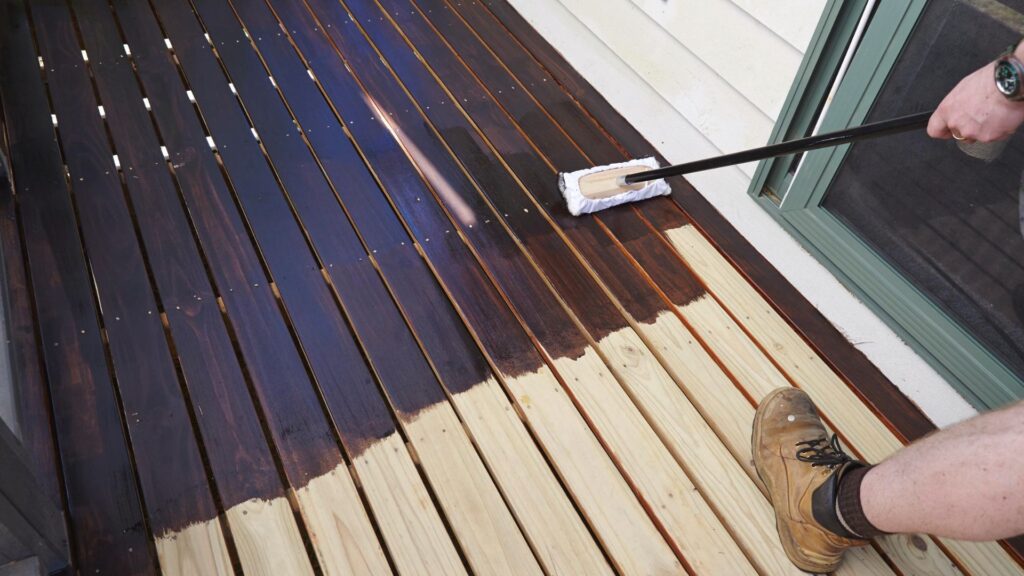
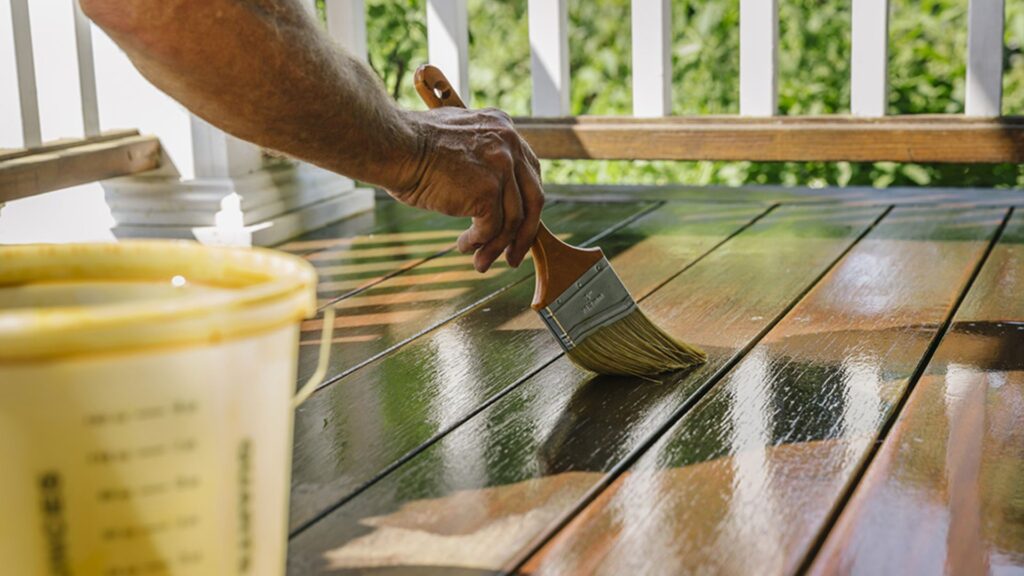
3. Applying the Stain
- Technique for Even Application: Use a brush or roller to apply the stain. Brushes are better for detailed work, while rollers cover large areas quickly. Start at one end of the deck and work your way across, applying the stain along the grain of the wood.
- Tricky Areas: For corners and edges, use a smaller brush to ensure even coverage. Be careful not to overload the brush to avoid drips.
- First Coat: Apply a thin, even coat. It’s better to apply two thin coats rather than one thick coat to avoid peeling and flaking.
4. Second Coat
- When to Apply: If a second coat is needed, wait for the first coat to dry completely. This typically takes 24-48 hours, depending on the stain and weather conditions.
- Application: Apply the second coat in the same manner as the first, ensuring an even and consistent finish.
5. Drying
Allow the deck to dry completely before using it. This may take several days depending on the weather and the type of stain used.
By following these steps meticulously, you can ensure your deck looks great and is protected from the elements. Regular maintenance, including periodic cleaning and re-staining, will keep your deck looking fresh for years to come.
Post-Staining Care And Maintenance
Drying Time
Once you’ve completed staining your deck, the drying time is crucial for ensuring the best results. Typically, you should allow the stain to dry for at least 24-48 hours before walking on it or placing any furniture. This time frame can vary based on the type of stain used and the weather conditions. For oil-based stains, a longer drying time is often necessary, whereas water-based stains might dry a bit faster. Make sure the deck is completely dry and free of tackiness before using it to avoid damaging the finish.
Routine Maintenance
Maintaining your stained deck is essential for prolonging its life and keeping it looking fresh. Here are some tips for routine maintenance.
1. Regular Cleaning: Sweep the deck regularly to remove dirt, leaves, and debris that can trap moisture and cause the wood to deteriorate. Use a soft-bristle brush to avoid scratching the surface.
2. Mild Detergent Wash: Occasionally, wash the deck with a mild detergent and water to remove any buildup of grime or mildew. Rinse thoroughly with clean water.
3. Inspect for Damage: Regularly inspect the deck for any signs of damage such as cracks, splinters, or loose boards. Address these issues promptly to prevent further deterioration.
4. Furniture Care: Use furniture pads under the legs of outdoor furniture to prevent scratches and marks on the stained surface. Move furniture around occasionally to avoid uneven wear.
When to Reapply
Knowing when to reapply stain is key to maintaining the beauty and protection of your deck. Here are some signs that it’s time to re-stain your deck.
1. Fading Color: If the color of the stain is starting to fade, it indicates that the protective layer is wearing off and needs a refresh.
2. Water Absorption: Conduct a water test by sprinkling water on the deck. If the water soaks in quickly rather than beading up on the surface, it’s time to re-stain.
3. Peeling or Flaking: Any signs of peeling, flaking, or cracking of the stain mean that it’s no longer providing adequate protection and needs to be reapplied.
4. Rough Texture: If the surface of the deck feels rough or splintered, it’s a good indicator that the wood is drying out and the stain needs to be reapplied to protect it.
By following these guidelines for post-staining care and maintenance, you can ensure that your deck remains a beautiful and functional outdoor space for years to come. Regular attention and timely re-staining will keep it protected from the elements and looking its best.
Common Mistakes To Avoid
Staining a deck can significantly enhance its appearance and durability, but it’s easy to make mistakes that can lead to unsatisfactory results. Here are some common pitfalls and how to avoid them.
Avoid Over-Staining
One of the most frequent errors homeowners make is over-staining their decks. While it might seem like applying an extra layer of stain would provide better protection, it often does more harm than good. Over-staining can result in a sticky surface that never fully dries, creating an unpleasant, tacky texture underfoot. Moreover, it can lead to uneven coloration and peeling over time.
How to Avoid Over-Staining
1. Read Manufacturer’s Instructions: Always follow the guidelines provided by the stain manufacturer regarding the number of coats.
2. Test in a Small Area: Before applying a full coat, test the stain on a small, inconspicuous area of the deck to see how it absorbs.
3. Use a Timer: Time your staining process to ensure you’re not applying too much in one area and allow sufficient drying time between coats.
Inconsistent Application
Achieving a consistent and even application of stain is crucial for a professional-looking finish. Inconsistent application can leave your deck looking blotchy and unattractive, with some areas appearing darker or lighter than others.
Tips to Ensure Even and Consistent Stain Application
1. Stir the Stain Regularly: Stains can settle and separate over time, so make sure to stir the stain frequently during application.
2. Use Proper Tools: Utilize high-quality brushes, rollers, or sprayers designed for deck staining to ensure an even spread.
3. Work in Small Sections: Break down the deck into manageable sections and complete one section at a time to maintain a wet edge and prevent lap marks.
4. Maintain a Consistent Pace: Apply the stain in long, continuous strokes and avoid stopping midway through a board.
Neglecting Preparation
Preparation is key to a successful staining job. Skipping or rushing through the prep work can lead to poor stain adhesion, premature wear, and an overall unsatisfactory finish. Proper preparation involves cleaning, sanding, and allowing the deck to dry thoroughly before applying the stain.
Emphasizing the Importance of Proper Prep Work
1. Clean Thoroughly: Remove all dirt, mildew, and old stain using a deck cleaner or power washer. This ensures the stain adheres properly to the wood surface.
2. Sand the Surface: Sanding helps to remove any rough spots and opens up the wood’s pores, allowing the stain to penetrate more effectively.
3. Check the Weather: Ensure you have a few days of dry weather ahead before starting your project. Staining a damp deck can trap moisture and lead to peeling.
4. Let it Dry: After cleaning and sanding, let the deck dry completely, which can take 24-48 hours depending on the weather conditions.
By avoiding these common mistakes, you can achieve a beautiful, durable finish that enhances the natural beauty of your deck and extends its lifespan. Taking the time to properly prepare, apply evenly, and avoid over-staining will result in a professional-quality job you can be proud of.
FAQs: About How To Stain A Deck NZ
Conclusion
In conclusion, this guide has covered everything you need to know about staining your deck, from choosing the right stain to preparing the surface and applying the stain effectively. By following these steps, you can achieve a beautiful, long-lasting finish that enhances the look and durability of your deck. We hope this information has boosted your confidence to tackle the project with ease. We encourage you to share your deck staining experiences or ask any further questions in the comments section below. Your feedback and engagement are valuable, and we look forward to hearing from you.
Find A Professional Deck Builder Company Near You!
- Balcony Construction Christchurch
- Deck Builders Alexandra
- Deck Builders Alexandra, Clyde & Cromwell
- Deck Builders Auckland
- Deck Builders Central Otago
- Deck Builders Christchurch
- Deck Builders Clyde
- Deck Builders Cromwell
- Deck Builders Hamilton
- Deck Builders Hawkes Bay
- Deck Builders Invercargill
- Deck Builders Kapiti Coast
- Deck Builders Kerikeri
- Deck Builders Lower Hutt
- Deck Builders Nelson
- Deck Builders New Plymouth
- Deck Builders Paihia
- Deck Builders Palmerston North
- Deck Builders Porirua
- Deck Builders Queenstown
- Deck Builders Taupo
- Deck Builders Tauranga
- Deck Builders Upper Hutt
- Deck Builders Wanaka
- Deck Builders Warkworth
- Deck Builders Wellington
- Deck Builders West Auckland
- Deck Staining Palmerston North
About the Author:
Mike Veail is a recognized digital marketing expert with over 6 years of experience in helping tradespeople and small businesses thrive online. A former quantity surveyor, Mike combines deep industry knowledge with hands-on expertise in SEO and Google Ads. His marketing strategies are tailored to the specific needs of the trades sector, helping businesses increase visibility and generate more leads through proven, ethical methods.
Mike has successfully partnered with numerous companies, establishing a track record of delivering measurable results. His work has been featured across various platforms that showcase his expertise in lead generation and online marketing for the trades sector.
Learn more about Mike's experience and services at https://theleadguy.online or follow him on social media: